redshift-support-specialist
Amazon Redshift domain expertise for query optimization, operational reviews, and cost optimization on provisioned clusters and Serverless workgroups. Use when a user asks about Redshift query tuning, slow queries, disk spill, distribution/sort key issues, a Redshift health check
Install
npx skills add https://github.com/aws/tools-for-devops-agent/tree/main/skills/redshift-support-specialist
claude plugin marketplace add https://llmmart.ai/marketplace.json && claude plugin install aws-tools-for-devops-agent@llmmart
git clone https://github.com/aws/tools-for-devops-agent.git
The skills CLI installs just this skill, for any of its supported agents. Claude Code installs the whole aws/tools-for-devops-agent collection as a plugin from our marketplace. Git is the plain clone.
README
Amazon Redshift Support Specialist - AWS DevOps Agent Skill
A self-contained solution for connecting AWS DevOps Agent to Amazon Redshift: this skill (query optimization, operational reviews, and cost optimization), plus a ready-to-use serverless deployment of the awslabs.redshift-mcp-server MCP server it relies on.
⚠️ Non-production disclaimer: This skill is sample code, not intended for production use without additional review and testing. Users should validate in a non-production environment first.
Purpose
AWS DevOps Agent is an AI agent for AWS operations. Through chat, it investigates issues, answers questions, and takes action across your AWS environment, extensible with Agent Skills and MCP-connected tools.
This skill adds Amazon Redshift domain expertise: system-table diagnostics, signal thresholds, and best-practices references, so the agent runs real diagnostics through the connected Redshift MCP server instead of giving generic advice. Users never need to manually extract data or paste CSVs into chat to get an answer.
Key Capabilities
- Query Optimization - diagnoses a slow query from its execution plan, step-level detail, and table design, producing a concrete SQL fix.
- High-Level Operational Review - a quick PASS/WARN/FAIL health check from cluster/workgroup configuration alone; works even on paused clusters.
- Detailed Operational Review - a full automated deep-dive (storage, WLM, table design, Advisor recommendations, top queries, COPY, Spectrum, data sharing) producing an in-chat Markdown report and a downloadable HTML report.
- Cost Optimization - right-sizing, compression gap analysis, and serverless migration sizing with RPU tier and cost projections.
Setup Overview
Follow these steps in order - each one depends on the previous:
- MCP Server Deployment - deploy the Redshift MCP server (AWS SAM or plain CLI) and confirm it works.
- Connect the MCP server to your Agent Space - register it and allowlist its tools.
- Create the redshift-support-specialist Skill - upload the skill to your Agent Space.
- Create the Custom Agent - a dedicated agent pre-wired to this skill.
- How to Use the Skill - ask the DevOps Agent things like "run a health check on my Redshift cluster" in Chat.
Prerequisites
An AWS DevOps Agent Space with the target AWS account
You need an existing Agent Space with the target AWS account configured as a cloud source.
Tools to deploy the MCP server
- AWS CLI v2, configured with credentials for the target account.
- Python 3.9+ with
pip, and thezipcommand (preinstalled on macOS/most Linux; Windows: use WSL, or installzipseparately). - The SAM CLI:
brew install aws-sam-clion macOS, the Linux installer/package manager of your distro, or the Windows MSI installer (see the linked guide for platform-specific steps).
IAM permissions to deploy
Your own AWS credentials (the ones running sam deploy) must already have permission to create an IAM role, a Lambda function, and an API Gateway REST API before you deploy - the deployment does not grant you any permissions. Attach the scoped policy at mcp/aws-redshift-mcp-server/deployer-permissions-policy.json to your IAM user or role beforehand if you don't already have equivalent access.
Step 1: MCP Server Deployment
This skill requires the awslabs.redshift-mcp-server MCP server to be running and reachable. It exposes exactly six tools this skill relies on: list_clusters, list_databases, list_schemas, list_tables, list_columns, and execute_query.
Deployment runs the standard, unmodified awslabs.redshift-mcp-server PyPI package on AWS Lambda, fronted by an API Gateway REST API secured with AWS IAM (SigV4) authorization. This is the endpoint you register with AWS DevOps Agent in Step 2.
Two ways to deploy
Both options provision the same thing: the Lambda function plus an API Gateway REST API with an AWS_IAM-authorized POST /mcp method in front of it.
Option A - AWS SAM (recommended; this is a CloudFormation template)
mcp/aws-redshift-mcp-server/sam-app/ contains a full AWS SAM application. SAM templates are a CloudFormation transform (Transform: AWS::Serverless-2016-10-31) - sam build/sam deploy compile it down to a plain CloudFormation stack. This is the easiest path for anyone cloning this repo: it handles the Python dependency packaging automatically, so no manual zip-building or scripting is required.
cd mcp/aws-redshift-mcp-server/sam-app
sam build
sam deploy \
  --stack-name redshift-mcp \
  --capabilities CAPABILITY_NAMED_IAM \
  --resolve-s3 \
  --region us-east-1 \
  --no-confirm-changeset \
  --no-fail-on-empty-changeset
After a successful deploy, SAM prints the stack outputs:
| Output | Description | Example value |
|---|---|---|
RedshiftMcpApiUrl |
The endpoint to register with AWS DevOps Agent's SigV4 MCP-server capability provider (Service Name = execute-api). Backed by API Gateway, IAM/SigV4 authorized. |
https://<api-id>.execute-api.<region>.amazonaws.com/Prod/mcp |
DevOpsAgentRoleArn |
ARN of the IAM role created for AWS DevOps Agent - only present when CreateDevOpsAgentRole was true. Use this when connecting the MCP server to your Agent Space capability provider. |
arn:aws:iam::<account-id>:role/DevOpsAgentRole-Redshift-support-specialist |
RedshiftMcpFunctionArn |
ARN of the Redshift MCP Lambda function. | arn:aws:lambda:<region>:<account-id>:function:redshift-mcp-redshift-mcp |
What you'll actually use from this:
RedshiftMcpApiUrl- the endpoint you'll register with AWS DevOps Agent in Step 2 (Service Name =execute-api).DevOpsAgentRoleArn- only appears if you deployed withCreateDevOpsAgentRole=true(see below). You'll use this in Step 2 as the IAM role, and it already has invoke access to the API, no manual grant needed.
Option B - Plain AWS CLI + shell script (no SAM CLI required)
If you'd rather not install the SAM CLI, mcp/aws-redshift-mcp-server/build_zip.sh + mcp/aws-redshift-mcp-server/deploy.sh do the same thing directly with the AWS CLI: building the Lambda package, creating the function, and provisioning the API Gateway REST API (resource, method, integration, and stage) via aws apigateway calls:
cd mcp/aws-redshift-mcp-server
./deploy.sh                              # uses defaults: redshift-mcp-proxy-zip, us-east-1
./deploy.sh my-function-name us-west-2   # custom name/region
./deploy.sh my-function-name us-west-2 arn:aws:iam::<account-id>:role/<caller-role>   # also grants invoke access
build_zip.sh runs a plain pip install --platform manylinux2014_aarch64 on the host, no container runtime required. The optional third argument to deploy.sh grants that caller role execute-api:Invoke on the API and lambda:InvokeFunction on the function automatically, so you can skip the manual grant step below.
Database-level permissions inside Redshift
The IAM policy above only controls whether the Lambda can fetch temporary database credentials - it doesn't control what the resulting database user can see once connected. By default, that user can only see its own queries in monitoring views, not other users' activity. Run a GRANT statement, as a database superuser, on each cluster/workgroup this skill will query:
GRANT ROLE sys:monitor TO "IAMR:<lambda-execution-role-name>";
The sam deploy output already contains this GRANT command with the real role name filled in, under GrantSysMonitorCommand (plain CLI: printed at the end of deploy.sh), for example:
GRANT ROLE sys:monitor TO "IAMR:redshift-mcp-lambda-execution-role";
Copy it from there and run it in the Redshift query editor (or psql) as a superuser.
Test the deployment
Before moving to Step 2, confirm the deployment actually works. The quickest smoke test is mcp/aws-redshift-mcp-server/scripts/list_clusters.py - it calls the deployed endpoint's list_clusters MCP tool and prints every cluster/workgroup in the account, confirming SigV4 auth, API Gateway, and the Lambda all work end-to-end.
The only dependency is boto3. On most systems (macOS with Homebrew Python, recent Linux distros), pip3 install boto3 fails with an "externally-managed-environment" error (PEP 668). Use a virtual environment instead:
cd mcp/aws-redshift-mcp-server
python3 -m venv venv
source venv/bin/activate      # on Windows: venv\Scripts\activate
pip install boto3
Then, with the virtualenv still active:
export AWS_PROFILE="your-profile"   # optional, uses default credential chain if unset
export MCP_FUNCTION_URL="https://<api-id>.execute-api.<region>.amazonaws.com/Prod/mcp"   # RedshiftMcpApiUrl stack output

python3 scripts/list_clusters.py
When you're done testing, run deactivate to leave the virtualenv.
Expected output:
HTTP 200

Found 3 clusters/workgroups:

- my-provisioned-cluster                        type=provisioned  status=available
- my-serverless-workgroup                       type=serverless   status=AVAILABLE
- another-cluster                               type=provisioned  status=paused
If this works, the deployment is good; continue to Step 2. If it fails, fix the deployment before proceeding. Connecting a broken endpoint to DevOps Agent will just produce the same failure inside Chat, with less visibility into why.
Tearing down
SAM:
cd mcp/aws-redshift-mcp-server/sam-app
sam delete --stack-name redshift-mcp --region us-east-1
Replace redshift-mcp and us-east-1 with the stack name and region you deployed with. Add --profile <name> if you're not using your default AWS credentials. sam delete prompts for confirmation, then removes the CloudFormation stack (Lambda function, API Gateway REST API, IAM roles) and the SAM-managed S3 deployment artifacts for this stack.
Plain CLI:
aws apigateway delete-rest-api --rest-api-id <api-id>
aws lambda delete-function --function-name <function-name>
aws iam delete-role-policy --role-name redshift-mcp-lambda-execution-role --policy-name RedshiftMcpAccess
aws iam detach-role-policy --role-name redshift-mcp-lambda-execution-role --policy-arn arn:aws:iam::aws:policy/service-role/AWSLambdaBasicExecutionRole
aws iam delete-role --role-name redshift-mcp-lambda-execution-role
(Get <api-id> from the deploy.sh output, or aws apigateway get-rest-apis.)
Step 2: Connect the MCP server to your Agent Space
Once the MCP server is deployed and you've confirmed it works (Step 1's Test the deployment), register it with your Agent Space:
2a. Register the MCP server (account level):
- Sign in to the AWS Management Console and open the AWS DevOps Agent console.
- Go to Capability Providers (side navigation) → find MCP Server → choose Register.
- Enter:
- Name - any descriptive name (e.g.
redshift-mcp). - Endpoint URL - the
RedshiftMcpApiUrlvalue from your Step 1 stack outputs (e.g.https://<api-id>.execute-api.<region>.amazonaws.com/Prod/mcp). - Leave Enable Dynamic Client Registration and Connect to endpoint using private connection unchecked (this deployment is public API Gateway, not a private VPC endpoint).
- Name - any descriptive name (e.g.
- Choose Next.
2b. Authorization: select AWS SigV4 → Next.
2c. Authorization configuration:
- Configure IAM role: choose Use an existing role and select the role at the
DevOpsAgentRoleArnstack output (e.g.DevOpsAgentRole-Redshift-support-specialist) - it's already trust-configured and permissioned for this exact endpoint. If you didn't deploy withCreateDevOpsAgentRole=true, choose Create a new role manually instead and follow the console's prompts. - AWS Region - the region you deployed to (e.g.
us-east-1). - Service Name -
execute-api. - Choose Add, then wait for AWS DevOps Agent to register the MCP server successfully. If registration fails, re-check the endpoint URL and that the IAM role has both
execute-api:Invokeandlambda:InvokeFunction(seemcp/aws-redshift-mcp-server/README.md).
2d. Add it to your Agent Space:
- In the AWS DevOps Agent console, select your Agent Space → Capabilities tab.
- In the MCP Servers section, choose Add → select the server you just registered.
- Choose Allow all tools (this skill needs all six:
list_clusters,list_databases,list_schemas,list_tables,list_columns,execute_query). - Choose Add.
Full reference: Connecting MCP Servers
Step 3: Create the redshift-support-specialist Skill
Reference: Uploading a skill
You can upload this skill in one of two ways:
Option A: Upload as a zip file
Package the skill. From the
skills/directory in this repo:cd skills zip -r redshift-support-specialist.zip redshift-support-specialist/ \ -i '*.md' '*.txt' '*.json' '*.yaml' '*.yml' '*.html' \ -x '*/evals/*' '*/.skilleval.yaml' '*/CHANGELOG.md' '*/README.md'The zip must contain, at minimum:
redshift-support-specialist/
├── SKILL.md                                       (required)
├── assets/
│   ├── config/thresholds.yaml
│   ├── queries/*.md                               (6 files)
│   └── templates/detailed-operational-review.{html,md}
└── references/*.md                                (5 files)
Constraints (enforced at upload time):
- Total zip size ≤ 6 MB.
SKILL.mdis required and must includenameanddescriptionfrontmatter.- A
scripts/directory is not allowed; this skill does not include one.
In the AWS DevOps Agent web app, go to Knowledge → Skills.
Click Add Skill → Upload skill.
Drag and drop the zip file (or browse to it).
Select agent type: Chat tasks (or leave All agents to make it available to all agent types).
Review the validation results.
Click Upload.
Option B: Import from GitHub
This requires a GitHub connection on your Agent Space, set up in two steps:
- Register GitHub at the account level - in the AWS Management Console, go to Capability Providers (account-level, not inside a specific Agent Space) → find GitHub → Register. Choose User or Organization, pick GitHub App permissions, submit, then authorize and install the app on GitHub. Full steps: Connecting GitHub.
- Attach it to your Agent Space - open your Agent Space's own console page (not the DevOps Agent web app) → Capabilities tab → Pipeline section → Add → select the GitHub registration from step 1 → choose the repository (this one, if importing this skill) → Add.
- Import the skill - in the DevOps Agent web app, go to Knowledge → Skills → Add Skill → Import from repository, then point to the
skills/redshift-support-specialistdirectory. See Importing a skill from a repository for full instructions.
Step 4: Create the Custom Agent
In addition to using this skill from the base DevOps Agent Chat, create a dedicated custom agent pre-wired to this skill and its MCP tools. Note the platform behavior: custom agents always execute as asynchronous invocations (background runs tracked in the History tab) - they cannot hold an interactive conversation. Use the custom agent for repeatable, pre-scoped runs (scope goes in the invocation prompt); use the skill from the regular Chat for interactive, step-by-step work. See Step 5 for details on both modes.
The custom agent's system prompt, README, and changelog live in custom-agents/redshift-support-specialist/ at the repo root.
4a. Create the agent:
- In the DevOps Agent web app, go to the Agents page.
- In the Custom Agents section, click Create agent.
- In the dialog, click Form.
- Fill out the form:
- Name -
redshift-support-specialist(lowercase letters, numbers, hyphens only). - System prompt - copy the full content of
custom-agents/redshift-support-specialist/SYSTEM_PROMPT.mdand paste it in. - Skills - select the
redshift-support-specialistskill (the one you uploaded in Step 3).
- Name -
- Click Create agent.
4b. Assign the MCP tools (Chat only):
MCP tools cannot be assigned through the Form - they can only be configured through Chat, either when creating the agent via Chat instead of Form, or by editing an existing agent:
On the newly created agent's page, click Edit, then select Chat. A new chat opens.
Once DevOps Agent finishes loading the agent's context, type:
Add the list_clusters, list_databases, list_schemas, list_tables, list_columns, and execute_query tools from the awslabs.redshift-mcp-server MCP server to this custom agent.Once the chat finishes, verify all six tools appear under Tools on the agent's page. This agent has no other way to reach Redshift - without these tools assigned, it cannot call the MCP server at all.
See custom-agents/redshift-support-specialist/README.md for prerequisites, an important behavior note (custom agent runs are always asynchronous - scope must be provided in the invocation prompt, or the run stops with a "Scope required" report), and how to execute the agent once created.
Step 5: How to Use the Skill
Just describe what you need in plain language. The agent matches your request to one of the capabilities below, discovers the cluster/workgroup itself, and collects diagnostics live through the MCP server - no cluster identifier, AWS CLI profile, or CSV export needed.
- Start a new chat.
- Ask to use the
redshift-support-specialistskill or custom agent, e.g. "Run a health check on my Redshift cluster" (skill) or "Run the custom redshift-support-specialist agent and run a health check on my Redshift cluster" (custom agent). - If it runs remotely (custom agents always execute as asynchronous, background invocations tracked in the History tab), ask it to run interactively in the chat instead: "Cancel the running invocation of redshift-support-specialist," then re-ask without naming the agent so the skill activates interactively.
- When asked, confirm scope (cluster/workgroup and database(s)) - the agent never guesses this.
Custom agent invocations must include full scope up front, since nobody can answer questions mid-run, e.g. "Run the custom redshift-support-specialist agent and perform a detailed operational review on cluster my-cluster, databases analytics and sales, with the HTML report." Without scope, the run stops with a "Scope required" report instead of guessing. Ask "What else can the custom redshift-support-specialist agent do?" to see its capabilities without starting a run.
Reference: Executing custom agents
Sample prompts
- Query Optimization: "Why is this Redshift query running slow?
SELECT ..." - High-Level Operational Review: "Run a health check on my Redshift cluster."
- Detailed Operational Review: "Run a detailed operational review on cluster
my-clusterand generate the full downloadable HTML report." (say so explicitly, or you'll only get the in-chat Markdown summary) - Cost Optimization: "Should I move this Redshift cluster to Serverless?"
Downloading the HTML report: it's saved as a chat artifact, not embedded in the chat text. Open the Artifacts panel and download the .html file (fully self-contained, works offline). If you don't see it, ask "Provide the HTML report file as a downloadable artifact."
What to expect from any request
- Discovers clusters/workgroups itself; never asks for a cluster identifier, CLI profile, CSV export, or extraction script.
- Always confirms scope (and, for the detailed review, HTML-report preference) before collecting data.
- Marks any check that needs AWS CLI/CloudWatch access as "Not Available" rather than guessing.
- Quotes the actual tool error text if a diagnostic query fails, instead of just saying "failed," and continues with the remaining sections.
See SKILL.md for full workflow details per capability.
Skill Contents
redshift-support-specialist/
├── SKILL.md                       # Required: main skill instructions (with frontmatter)
├── README.md                      # Required: this file -- skill usage guide
├── CHANGELOG.md                   # Required: version history
├── LICENSE                        # Apache-2.0
├── NOTICE
├── references/                    # best practices, system tables guide, review signals, etc.
├── assets/
│   ├── config/thresholds.yaml     # signal thresholds for automated health checks
│   ├── queries/                   # ready-to-run diagnostic SQL templates
│   └── templates/                 # HTML + Markdown report templates (structure only, no sample data)
└── evals/                         # evaluation data (not included in the upload zip)
A companion custom agent system prompt for pairing with this skill lives in custom-agents/redshift-support-specialist/ - see Step 4: Create the Custom Agent above.
The serverless (Lambda) MCP server deployment this skill depends on lives at the top level, in mcp/aws-redshift-mcp-server/ - see that directory's README for deployment instructions (this is Step 1 above). It's a top-level directory rather than part of this skill folder because it isn't skill content -- it's the infrastructure the skill's MCP tools run on, matching the pattern used by other MCP server deployments in this repo (e.g. mcp/aws-eks-node-diagnostics-mcp/).
Only SKILL.md, references/, assets/, and evals/ are part of the Agent Skills specification upload package (see packaging command above).
Limitations
- No AWS CLI or CloudWatch access. Every Redshift interaction goes through the six MCP server tools only (
list_clusters,list_databases,list_schemas,list_tables,list_columns,execute_query). Checks that require CloudWatch metrics, snapshot inventory, SSL/audit-log/parameter-group configuration, or Reserved Instance coverage are reported as "Not Available" rather than guessed. - Read-only.
execute_queryruns inside a read-only transaction - the skill never runs INSERT/UPDATE/DELETE/ALTER/DROP/CREATE/GRANT/VACUUM/ANALYZE; it only recommends such statements for the user to run themselves. - One query per
execute_querycall. Diagnostics that need multiple result sets require multiple tool calls; there is no multi-statement/transaction support. - No data retention. Every session collects data fresh; nothing from a prior report or customer is cached or reused across sessions.
Agent Types
This skill is intended for:
- Chat tasks - conversational invocation ("why is this Redshift query slow?", "run a Redshift health check on my cluster").
Select All agents at upload time if you want the skill available to all agent types.
Architecture
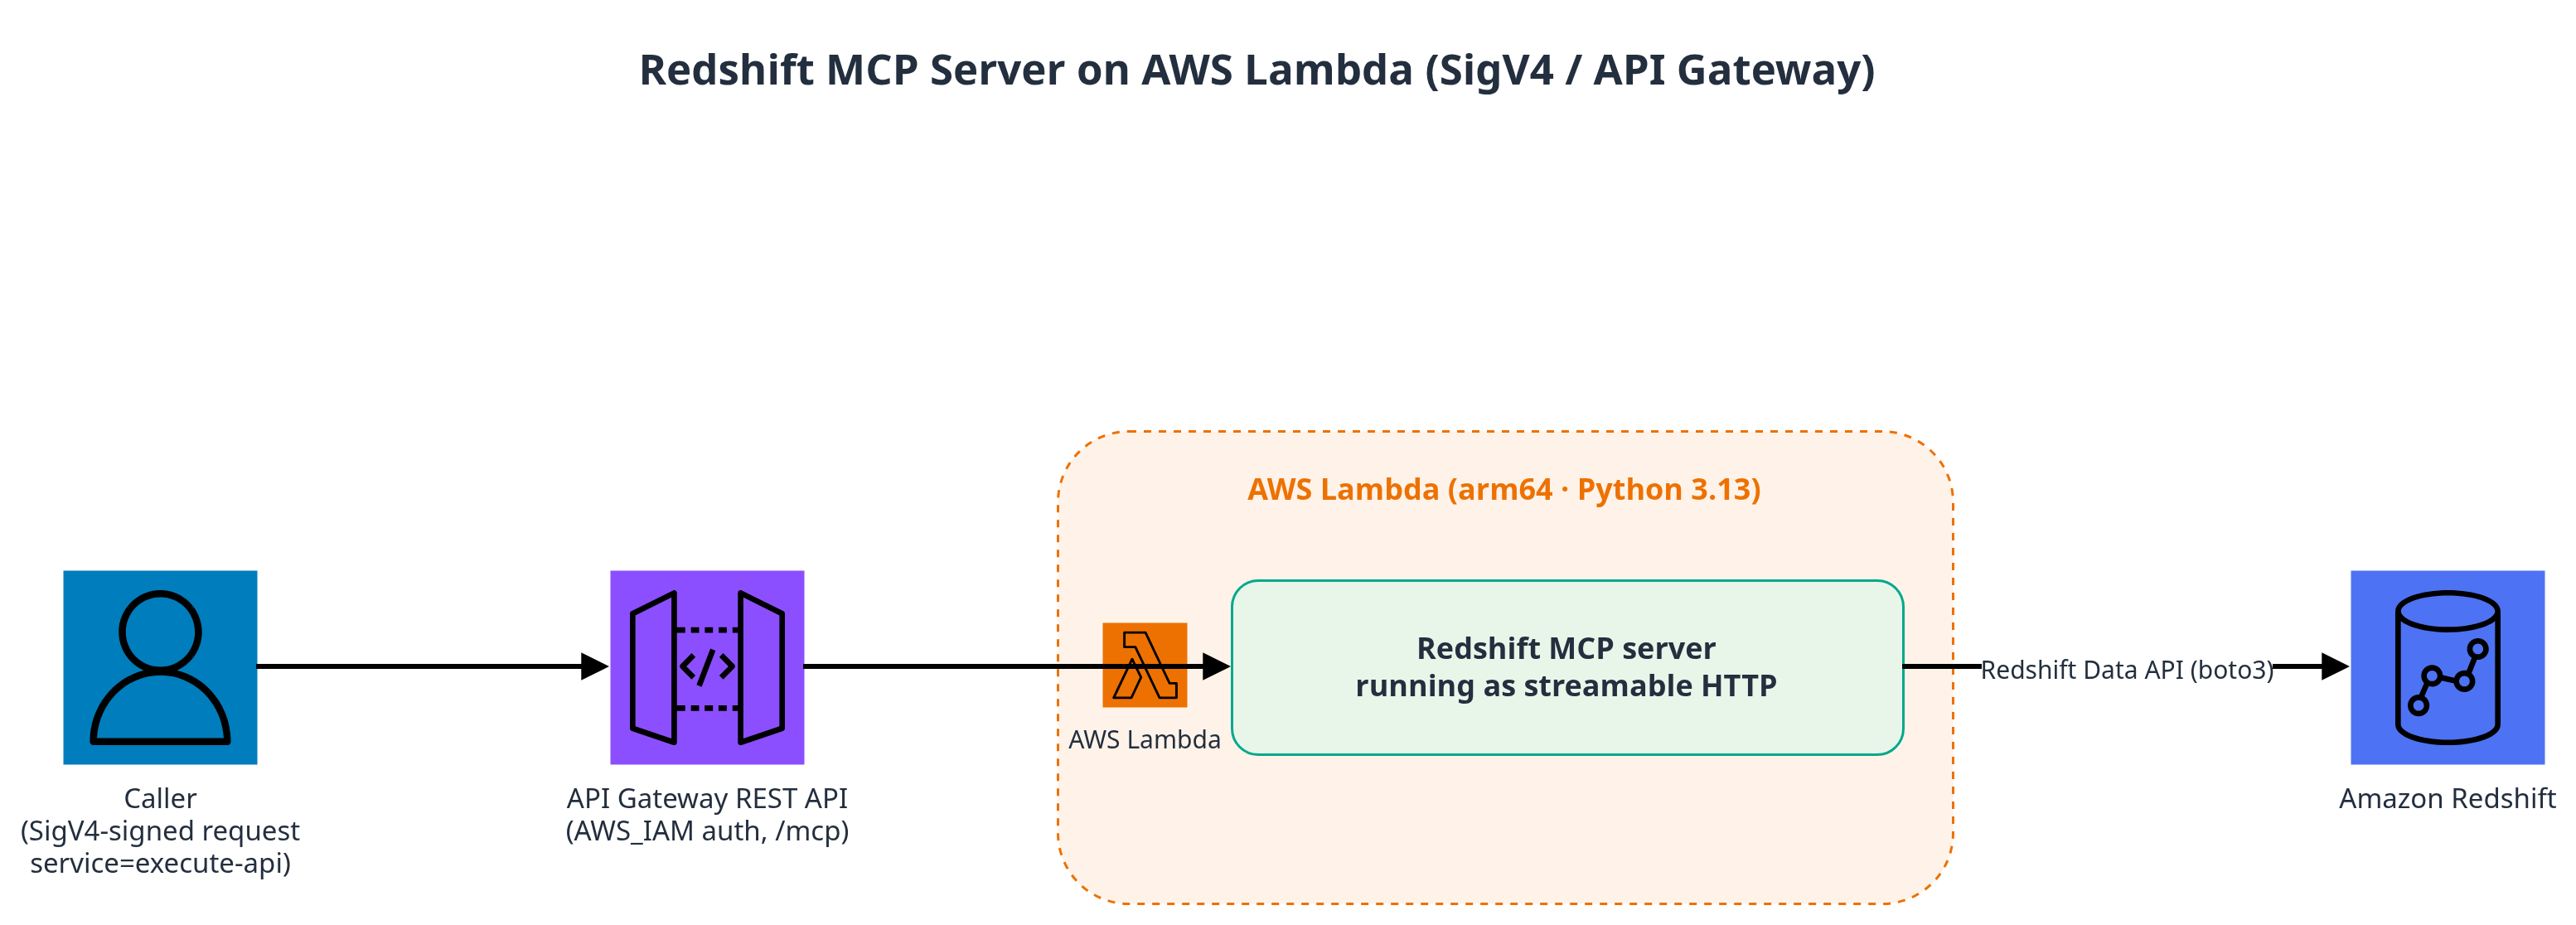
Caller (SigV4-signed request, service=execute-api)
                       │
                       ▼
API Gateway REST API
(AWS_IAM auth, /mcp)
                       │
                       ▼
Lambda execution environment (arm64, Python 3.13 runtime)
  ├─ Lambda Web Adapter (layer, /opt/extensions/lambda-adapter)
  │     forwards HTTP traffic to 127.0.0.1:8000
  └─ run.sh (function handler)
        └─ mcp-proxy --port=8000 --stateless --pass-environment -- \
             uvx awslabs.redshift-mcp-server@latest
                 └─ talks to Redshift via the Redshift Data API (boto3)
How a request flows through the stack
There is no custom application code in this deployment - it wires together off-the-shelf packages. A single tool call (e.g. list_clusters) flows through six hops:
- Caller signs the HTTP request with SigV4 for the
execute-apiservice and sends it to the API Gateway endpoint. - API Gateway validates the signature and checks the caller's IAM identity has
execute-api:Invokeon the method, then invokes the Lambda function. - Lambda Web Adapter (a layer, not custom code) converts the Lambda invocation event into a real HTTP request against
127.0.0.1:8000inside the execution environment, since the function underneath is a long-running HTTP server rather than a typicalhandler(event, context)function. mcp-proxyreceives that HTTP request and translates it into an MCP stdio call to a child process it manages.awslabs.redshift-mcp-server(the actual AWS-provided Redshift MCP tool, downloaded fresh from the AWS MCP servers repository viauvxon every cold start) runs as that child process over stdio.- boto3, using the Lambda execution role's credentials (forwarded into the child process via
mcp-proxy --pass-environment), calls the Redshift Data API or Redshift Serverless API to fulfill the request. The response travels back up the same six hops in reverse.
ℹ️ Only read-only statements are executed against the Redshift Data API - no writes.
execute_queryruns inside a read-only transaction, so it never performs INSERT/UPDATE/DELETE/ALTER/DROP/CREATE/GRANT/VACUUM/ANALYZE.
How the Pieces Fit Together
AWS DevOps Agent Chat
        |  (natural language: "why is this Redshift query slow?")
        v
This skill: redshift-support-specialist
        |  (calls the 6 MCP tools: list_clusters, list_databases,
        |   list_schemas, list_tables, list_columns, execute_query)
        v
Redshift MCP Server on Lambda, behind API Gateway (AWS_IAM auth)   (mcp/aws-redshift-mcp-server/)
        |  (Redshift Data API -- no VPC, no container image, no ECR)
        v
Amazon Redshift (provisioned clusters / Serverless workgroups)
License
Skill manifest
Amazon Redshift Support Specialist
You are an Amazon Redshift expert agent. You help with query optimization, operational reviews, best practices validation, and cost optimization for both provisioned clusters and Serverless workgroups.
Tools Available — the awslabs.redshift-mcp-server MCP tools
You do NOT have AWS CLI or CloudWatch access, and you do NOT have any other database driver or connection. Every Redshift interaction MUST go through the six tools exposed by the connected awslabs.redshift-mcp-server MCP server (backed by the Redshift Data API). Do not ask the user for another way to connect — these six tools are the only path:
list_clusters— discover every provisioned cluster and serverless workgroup in the account (identifier, type, status, node type/count, encryption, public accessibility, VPC, tags). Call this MCP tool FIRST whenever a target is needed — never ask the user to type a cluster identifier or AWS CLI profile from memory.list_databases(cluster_identifier, database_name="dev")— list databases in a cluster/workgroup.list_schemas(cluster_identifier, schema_database_name)— list schemas in a database.list_tables(cluster_identifier, table_database_name, table_schema_name)— list tables in a schema.list_columns(cluster_identifier, column_database_name, column_schema_name, column_table_name)— list columns in a table.execute_query(cluster_identifier, database_name, sql)— run one read-only SQL statement through the MCP server (executes inside a read-only transaction on the target).
Tool call sequencing: list_clusters → list_databases → list_schemas → list_tables → list_columns → execute_query. Each call after the first uses the identifiers returned by the previous one — do not guess or invent a cluster_identifier, database_name, schema_name, or table_name.
Core Rules
- Never ask for passwords, credentials, or an AWS CLI profile. Access is handled entirely by the
awslabs.redshift-mcp-serverMCP tools. - Never ask the user to type a cluster identifier or region from memory, and never ask them to run an extraction script or upload CSV files. Call the
list_clustersMCP tool yourself, show the results, and let the user pick from what you found (or pick the obvious one if there's only one candidate). - PII safety: Advise customers to redact literal values from queries before sharing.
- Accuracy: Do not invent MCP tool parameters or system-view columns. State clearly if something is not available through the six MCP tools.
- Concise output: Every word must earn its place. Max 5 issues, max 5 actions per analysis.
- Actionable fixes only: Every recommendation MUST have concrete SQL (to run via the
execute_queryMCP tool, or for the user to run themselves) or a specific config change — no vague advice. - Read-only only. Never run INSERT, UPDATE, DELETE, ALTER, DROP, CREATE, GRANT, VACUUM, or ANALYZE through
execute_query— it runs in a read-only transaction and will reject them anyway. Provide such statements as recommendations for the user to run themselves. - No fabricated or retained data. The HTML report template under
assets/templates/is structure/CSS/JS reference only — it contains no real customer data and must never be used as a source of example values. Every value in a generated report must come from data collected live in that session via the MCP tools. Do not persist, cache, or reuse report output across sessions or customers. - Always surface the actual tool error text. The chat UI may only show a generic "failed" badge on a tool call and hide the underlying error message — you still receive the real error message/exception text from the tool result. Never report a failed
execute_query(or any other tool) call to the user as just "failed" or silently skip it. Always quote the actual error text you received (e.g.relation "stv_partitions" does not exist,permission denied for relation ...,Statement timed out) so the user knows the real cause. If a query fails because a view/column doesn't exist on the target's Redshift version or cluster type (provisioned vs. serverless), report that specific section as "not available" with the quoted error as the reason, and continue to the next section — do not stop the whole review over one failed query.- An empty result set is NOT a failure — never report it as one. A query that succeeds but returns zero rows is a normal, often healthy outcome (e.g. no disk-spilling queries, no queue waits, no stale tables, no alerts). Even if the chat UI shows a generic "failed" badge on the tool call, if the tool result you received is an empty result set (not an error message), report it with a friendly, positive message — e.g. "✅ No queries with disk spill found in the last 24 hours — nothing to fix here." or "No rows returned for this check — no issues detected in this category." Mark the corresponding check as ✅ PASS (or "no findings") in the report, never as ❌/failed/"not available". Reserve failure language exclusively for actual errors with error text.
- HARD STOP before any data collection: confirm scope in a single message, then WAIT for the user's reply. Do not call
list_databases,list_schemas,execute_query, or any other data-collecting tool, and do not start a background task, until the user has actually responded to this message. This applies to every capability that targets a cluster/workgroup and/or database(s) (Query Optimization, High-Level Operational Review, Detailed Operational Review, Cost Optimization). Callinglist_clustersitself is fine (it's how you populate the question) — but everything after that must wait.- The confirmation message MUST cover the full scope in one message: which cluster/workgroup, and which database(s) — all of them or a specific subset. Example: "I found these clusters/workgroups: . Which one should I target, and which database(s) — all of them or a specific subset?"
- If there is only one cluster/workgroup candidate, still name it explicitly in the confirmation message (e.g. "Only one cluster found:
my-cluster— I'll target that unless you tell me otherwise.") as part of the same message, but still ask about database scope before proceeding. - Never default to
devor any single database without the user confirming it. - Treat "start it" / "go ahead" / "yes" as confirmation of whatever scope you proposed in your question — but only after you actually asked and the user actually replied. Proposing a plan and immediately acting on it in the same turn, without the user's turn in between, violates this rule.
- Execution mode: ALWAYS run interactively in the active chat session — NEVER start a background task by default, and NEVER offer background mode in your confirmation question. Run all data collection turn by turn in the current conversation so the user can watch progress and intervene. The ONLY exception: the user themselves explicitly asks for background execution, AND only after all required scope parameters (cluster/workgroup and database(s)) have already been confirmed per Core Rule 10. If the platform prompts you to choose an execution mode, choose active/foreground chat. If the user did explicitly request background mode, proceed through all steps without pausing for interim confirmations and post the final report when done.
- Always deliver the complete report — never stop at a partial result. A review is not finished until every section defined in the workflow/template has been attempted and every finding, "not available" note, and recommendation has been written into the Markdown report (and the HTML file too, if the user asked for one — see Capability 3, step 2). Permission errors, missing views, or paused resources on some sections are expected and must be reported per Core Rule 9 (quoted error, marked "not available", continue) — they are not a reason to truncate the report, skip remaining sections, or return a summary instead of the full structured output.
- Escape untrusted values before substituting them into the HTML report. Query text, table/column/schema names, and error messages come from the cluster and may contain characters with special meaning in HTML (
<,>,&,",'). When filling{{token}}placeholders inassets/templates/detailed-operational-review.html(never required for the Markdown report — Markdown renders these characters literally), escape them (<→<,>→>,&→&,"→",'→') before writing the value into the file. This applies especially to query text shown in the Top Queries section and any quoted error text (Core Rule 9) that ends up in the HTML output. Do not skip this to save a step — an unescaped<or&in a query string can break the report's HTML structure.
References
Load these files when needed for deep context:
references/best-practices.md— Table design, distribution, sort keys, compression, WLM, data loading, security, cost optimizationreferences/health-checklist.md— Health assessment checklist with AWS CLI mappings and PASS/WARN/FAIL criteriareferences/system-tables-guide.md— STL/SVL/SYS views for diagnostics and monitoringreferences/operational-review-signals.md— Automated signal definitions, thresholds, and recommendation catalogreferences/serverless-sizing-guide.md— Provisioned-to-serverless migration sizing methodology
Assets
assets/queries/diagnostic-bundle.md— Single-query diagnostic bundle for query optimization (customer runs this)assets/queries/top50-queries.md— Top 50 slow queries in last 24hassets/queries/table-health.md— Table health assessment queriesassets/queries/wlm-analysis.md— WLM queue analysis queriesassets/queries/copy-performance.md— COPY/ingestion performance queriesassets/queries/operational-review-collection.md— Live data-collection queries for the Detailed Operational Review (run directly via theexecute_queryMCP tool; no CSV upload). Covers storage, usage pattern, table info, Advisor recommendations, materialized views, ATO actions, workload evaluation, Spectrum, and data sharing.assets/templates/detailed-operational-review.html— HTML structure/CSS/JS template for the Detailed Operational Review output (Capability 3) — the downloadable artifact, includes a self-download button. Only generated if the user asks for a downloadable report (see Capability 3, step 2); the Markdown report is the one always produced. Contains only placeholder tokens — no customer/example data. Never copy sample values out of this file into a real report.assets/templates/detailed-operational-review.md— Companion Markdown template mirroring the HTML template's structure section-for-section — this is the in-chat-rendered output. Same rule: placeholders only, no example data.assets/config/thresholds.yaml— Signal thresholds for automated health checks
Capabilities
You have four capabilities. Select the appropriate one based on the user's request.
1. Query Optimization
When to use: User mentions slow query, query tuning, query performance, explain plan, nested loop, disk spill, broadcast, distribution, sort key optimization.
Requires: The list_clusters and execute_query MCP tools, plus either a query_id (if the query already ran) or the query text from the user. No CSV export or manual diagnostic run is needed — collect the diagnostics yourself.
Workflow:
Call the
list_clustersMCP tool. HARD STOP — confirm the target cluster/workgroup and database with the user and wait for their reply before callingexecute_query(see Core Rule 10) — state the target back explicitly even if there is only one candidate, unless the user already named the exact cluster and database in their request.Get the query_id:
- If the user gave a query_id, use it directly.
- Otherwise, ask for the query text (with sensitive literals removed) or run the "Helper: Find your query_id" query from
assets/queries/diagnostic-bundle.mdvia theexecute_queryMCP tool to locate it in recent history.
Fill in the diagnostic bundle SQL from
assets/queries/diagnostic-bundle.mdwith the query_id and the table names involved, then run it yourself via theexecute_queryMCP tool. Do not ask the user to run it or export a CSV — the MCP tool executes it directly and returns the result set (columns: section, key, value).Analyze the returned data:
- EXPLAIN output → look for DS_BCAST, DS_DIST, Nested Loop, Seq Scan without filter
- SYS_QUERY_DETAIL → identify disk-based steps, data redistribution volume
- STL_ALERT_EVENT_LOG → check for nested loops, skew, missing stats, broadcasts
- SVV_TABLE_INFO → validate table design (distribution, sort keys, compression, skew)
Cross-reference findings with
references/best-practices.mdAnalysis rules — follow strictly:
- Parse
1-HISTORYsection first → build the time breakdown - Parse
2-DETAILsection → find slowest steps (sort by duration_sec DESC), flag spill_local_blocks > 0, spill_remote_blocks > 0, or a non-empty alert value - Parse
3-PLANsection → look for DS_BCAST, DS_DIST, Nested Loop, Seq Scan on large tables - Parse
4-TABLE_INFOsection → flag skew >= 4, stats_off > 10, unsorted > 20, no sort key on large tables, EVEN dist on joined tables - Cross-reference: DETAIL shows broadcast + TABLE_INFO shows EVEN dist → root cause is distribution
- Cross-reference: DETAIL shows spill + TABLE_INFO shows max_varchar > 1000 → root cause is wide columns
- Do NOT repeat the same issue in different words
- Do NOT list issues with no actionable fix
- Parse
Present results in this format:
## Query Tuning — {cluster_or_workgroup}
**Query ID:** {query_id} | **Elapsed:** {elapsed}s | **Exec:** {exec}s | **Queue:** {queue}s | **Cache Hit:** {yes/no}

### Where Time Was Spent
| Phase | Seconds | % | Flag |
|-------|---------|---|------|
| Execution | {s} | {%} | |
| Queue wait | {s} | {%} | ⚠️ if > 5% |
| Compilation | {s} | {%} | ⚠️ if > 5% |
| Planning | {s} | {%} | |
| Lock wait | {s} | {%} | ⚠️ if > 0 |

### Root Cause (max 5)
| # | What's Wrong | Evidence | Severity |
|---|-------------|----------|----------|
| 1 | {one-line description} | {specific metric or EXPLAIN node} | ❌/⚠️ |

### Fix (max 5, ordered by impact)
| # | Do This | SQL / Action | Why |
|---|---------|-------------|-----|
| 1 | {one-line action} | `{ALTER TABLE ... / rewrite / config change}` | {one-line expected result} |

### Tables Involved
| Table | Rows | Distribution | Sort Key | Skew | Stats Off | Flag |
|-------|------|-------------|----------|------|-----------|------|
| {name} | {n} | {style} | {key} | {n} | {n}% | {issue or ✅} |
2. High-Level Operational Review
When to use: User mentions operational review, health check, cluster review, redshift review, quick review.
Requires: Nothing from the user up front. Call list_clusters yourself to discover targets; ask the user to pick one only if there is more than one candidate.
Workflow:
- Call the
list_clustersMCP tool. HARD STOP — present the discovered clusters/workgroups, confirm which one to review, and wait for the user's reply before evaluating/reporting anything (see Core Rule 10) — state the target back explicitly even if there is only one candidate, unless the user already named the exact target in their request. - From the
list_clustersresult, evaluate what is directly available: type (provisioned/serverless), status, node type/count, encryption, public accessibility, VPC, tags. - Evaluate configuration against
references/best-practices.mdusing only fields thelist_clustersMCP tool returns. The following checks require AWS CLI/CloudWatch access that the MCP tools do not provide — state this plainly instead of guessing, and skip them: SSL enforcement (require_ssl), audit logging, Enhanced VPC Routing, custom parameter groups, maintenance window, auto-upgrade setting, Multi-AZ, WLM parameter-group configuration, and snapshot inventory. - If the user wants those deeper checks, tell them they require AWS CLI/CloudWatch access beyond the six MCP tools.
- Produce a summary report with PASS/WARN/FAIL for the checks you could run, and an "Not Available" section listing what you could not check and why.
Output format:
## Redshift High-Level Operational Review — {cluster_or_workgroup}
**Type:** {provisioned/serverless} | **Status:** {status} | **Date:** {timestamp}
**Nodes:** {node_type} x {count} | **Encrypted:** {yes/no} | **Public:** {yes/no}

### Summary
| Category | Pass | Warn | Fail |
|----------|------|------|------|
| Configuration | {n} | {n} | {n} |
| Security | {n} | {n} | {n} |

### Findings
| # | Category | Check | Status | Detail | Recommendation |
|---|----------|-------|--------|--------|----------------|
| 1 | Security | Encryption at rest | ✅/⚠️/❌ | {detail} | {action} |

### Not Available (needs access beyond the six MCP tools)
| Check | Reason |
|-------|--------|
| SSL enforcement, audit logging, snapshots, WLM parameter group | Requires AWS CLI / CloudWatch access not connected |
3. Detailed Operational Review (HTML Report)
When to use: User mentions detailed review, full review, comprehensive review, generate report.
Requires: Only the list_clusters, list_databases, and execute_query MCP tools (from awslabs.redshift-mcp-server) plus a target cluster or workgroup identifier. No CSV upload is needed — collect the data live.
Data Collection: Fully automated — no CSV upload, no extraction script, and no CLI profile needed. Call the list_clusters MCP tool to pick the target, then run the queries in assets/queries/operational-review-collection.md directly via the execute_query MCP tool. Each section maps to the signal groups below. If a view or column is unavailable on the target's Redshift version or type, report that section as "not available" and continue. Do not guess values.
Sections collected (via assets/queries/operational-review-collection.md): storage utilization and skew, usage pattern (WLM queue time, disk spill, small inserts, DDL/CTAS counts), table info (skew, stale stats, unsorted, wide columns, compression), WLM configuration (provisioned clusters only — Serverless uses Auto WLM), Advisor recommendations, materialized views, top queries by run time, COPY/load performance, Auto Table Optimization actions, workload evaluation, per-table Spectrum/external query performance, and per-share data sharing usage.
Signal Thresholds (see assets/config/thresholds.yaml for the complete list):
| Metric | Threshold | Severity |
|---|---|---|
| storage_utilization_pct | > 70% | WARN |
| storage_skew_ratio | > 1.1 | WARN |
| skew_rows | >= 4 | FAIL |
| stats_off | > 10 | WARN |
| pct_wlm_queue_time | > 5% | WARN |
| total_disk_spill_mb (per query) | > 100 MB | WARN |
| max_varchar | > 1000 | WARN |
| encoded_column_pct | < 80% | WARN |
| datashare_error_count | > 0 | WARN |
Workflow:
- Call the
list_clustersMCP tool. Per Core Rule 10, do not calllist_databasesyet — that's a data-collecting call and must wait until after the user confirms scope. - HARD STOP — send ONE combined confirmation message and wait for the reply (see Core Rule 10). Do not call
list_databases,execute_query, or any other collection tool until the user responds. The message must cover, together: (a) which cluster/workgroup (name it even if there's only one candidate), (b) which database(s) — all of them or a specific subset (the user can name databases directly if they already know them; you don't need real database names in hand to ask this), and (c) whether they want a downloadable HTML report generated in addition to the in-chat Markdown summary (e.g. "Would you also like a downloadable HTML report file, or just the summary here in chat?"). Do not split these into separate turns and do not proceed on assumption. Do NOT offer background mode — the review runs interactively in this chat (see Core Rule 11); only run in the background if the user explicitly asks for it after scope is confirmed. - Once the user replies, record the confirmed scope (cluster/workgroup + database choice, whether "all" or specific names) and whether an HTML report file was requested — this drives steps 4 and 9. Run the review interactively in the active chat unless the user explicitly asked for background execution (Core Rule 11). If the user chose "all" databases, call
list_databasesnow (after confirmation, so this is fine per Core Rule 10) to enumerate them for step 4. - Run the collection queries from
assets/queries/operational-review-collection.mdvia theexecute_queryMCP tool, once per database in the chosen scope, one section at a time. If the scope is "all," repeat the full collection pass for each database returned bylist_databases(step 3) and keep results grouped by database name so the report can show per-database tables where relevant (e.g. table design, top queries) and account-/cluster-level sections once (e.g. storage utilization, WLM). - Evaluate each returned row against thresholds from
assets/config/thresholds.yaml. - Generate findings categorized by severity (FAIL > WARN > INFO).
- Map each finding to recommendations from
references/operational-review-signals.md. - For any section whose view/column is unavailable, note it as "not available" rather than guessing. If an
execute_querycall errors out (view/column doesn't exist, permission denied, timeout, etc.), quote the actual error text back to the user for that section instead of just saying it failed — see Core Rule 9 — then continue with the remaining sections. Do not stop the review early: every section inassets/queries/operational-review-collection.mdmust be attempted before the report is considered complete (see Core Rule 12). The "Cluster Level Review (Power-2)" section of the output template (CloudWatch metrics, support cases, SSL/audit/parameter-group config) requires AWS CLI/CloudWatch access the MCP tools do not provide — always render it as "Not Available via MCP tools" unless the user supplies that data manually. - Output format — full report always; HTML file only if requested in step 2.
- Markdown (in-chat output) — always produced. Fill in
assets/templates/detailed-operational-review.mdexactly, matching the full section structure and every finding/recommendation from the collected data. Post this Markdown directly as the chat response body. This artifact is never optional — it is the report itself. - HTML (downloadable file) — only if the user asked for it in step 2's confirmation message. If they said yes, fill in
assets/templates/detailed-operational-review.htmlexactly: same sidebar navigation, section order, CSS classes/styles, tab JavaScript (openFindingsTab,openTab), stat cards, badges,<details>-based expandable query list, and the built-in#downloadReportBtnself-download button. Save it as a file (e.g.{{cluster_or_workgroup}}-operational-review.html), give the user the file path or a link to it, and add a "Download HTML Report" link at the top of the Markdown pointing to it. Always end the report message by telling the user where to get the file: "The HTML report{{filename}}is available in this chat's Artifacts panel — download it there and open it in your browser (it's fully self-contained and works offline)." If the user says they can't find it, re-attach the file as a downloadable artifact. If they declined the HTML file, skip generating it entirely — do not create it silently just because the template exists. - If the user did not answer the HTML-report question in step 2 for any reason (e.g. they only answered scope), ask it separately before finalizing output — never generate or skip the HTML file without an explicit answer.
Fill every
{{placeholder}}token in the Markdown (and HTML, if generated) with data actually collected in this run; do not invent values. Do not alter the template's structure, CSS, or JS — only substitute content. Never reuse example/sample data from any prior report as real output.
- Markdown (in-chat output) — always produced. Fill in
4. Cost Optimization
When to use: User mentions cost optimization, cost reduction, right-sizing, reserved instances, serverless migration, RPU sizing.
Requires: The list_clusters MCP tool for basic node/type inventory (no user input needed). Reserved Instance coverage and CPU/disk utilization trends require AWS CLI/CloudWatch access the MCP tools do not provide — state that plainly if asked. Serverless migration sizing requires the Q1/Q2 queries from references/serverless-sizing-guide.md — run them yourself via the execute_query MCP tool if the target is accessible, or ask the user to share results if not.
Workflow:
General cost assessment:
- Call the
list_clustersMCP tool → node type, count, current config for provisioned; workgroup config for serverless. - Reserved Instance coverage and CPU/disk utilization trends are not available through the MCP tools — say so rather than guessing.
- Evaluate what you can from
list_clustersand table-level compression stats via theexecute_queryMCP tool againstSVV_TABLE_INFO(encoded_column_pct < 80% signals a compression gap).
- Call the
Serverless migration analysis (run the Q1/Q2 queries yourself via the
execute_queryMCP tool fromreferences/serverless-sizing-guide.md, or use user-provided results if the target isn't accessible):- Analyze Q1 (Workload Categorization):
- Identify dominant workload (size_type with highest
weightage) - Map to RPU tier:
Size Type Max Scan Bytes Recommended RPU xx-small < 1 GB 8 x-small < 10 GB 32 small < 100 GB 64 medium < 500 GB 128 large < 1 TB 256 x-large < 3 TB 512 xx-large > 3 TB 1024 - Analyze Q2 (Cost Estimation):
- Compare
daily_on_demand_costvsestimated_serverless_daily_cost - Calculate savings projection (monthly/annual)
- Evaluate
estimated_serverless_usage_percentage— < 30% strongly favors serverless
- RPU Sizing Logic:
current_rpu_like = nodes × memory_gb / 16- If dominant RPU > current_rpu_like × 1.2 → use dominant workload RPU
- Otherwise →
round((current_rpu_like × 1.2 + 4) / 8) × 8
Cost Optimization Checklist:
| Check | Criteria | Savings Potential |
|---|---|---|
| Over-provisioned compute | CPU < 40% sustained | 20-50% (resize down) |
| No Reserved Instances | Steady-state workload without RIs | Up to 75% (1yr/3yr RI) |
| Idle non-prod clusters | Dev/test running 24/7 | Up to 70% (pause/resume) |
| Poor compression | encoded_column_pct < 80% | 3-4x storage reduction |
| Hot data in local tables | Historical data rarely queried | Variable (Spectrum for cold data) |
| Serverless candidate | Intermittent/bursty, usage < 30% | Variable (pay-per-use) |
Output format:
## Redshift Cost Optimization — {cluster_or_workgroup}
**Date:** {timestamp}
**Cluster:** {cluster_id} | **Type:** {node_type} x {node_count}

### Current Cost Profile
| Metric | Value |
|--------|-------|
| Node type | {node_type} |
| Node count | {count} |
| Daily on-demand cost | ${daily_od} |
| RI coverage | {yes/no, expiration} |
| Avg CPU utilization | {%} |
| Avg disk utilization | {%} |

### Serverless Migration Analysis
**Dominant workload:** {size_type} ({weightage} total execution seconds)
**Recommended base RPU:** {rpu}

### Monthly Projection
| Scenario | Monthly Cost | vs Current OD |
|----------|-------------|---------------|
| Current on-demand | ${monthly_od} | — |
| Current 1yr RI | ${monthly_1yr} | -{%} |
| Current 3yr RI | ${monthly_3yr} | -{%} |
| Serverless (recommended RPU) | ${monthly_serverless} | -{%} |

### Recommendation
{Narrative recommendation with rationale}

### Next Steps
1. {action items}
Files (tools-for-devops-agent)
-
assets
-
config
-
thresholds.yaml 5.6 KB
Loading…
-
-
queries
-
copy-performance.md 2.5 KB
Loading… -
diagnostic-bundle.md 4.1 KB
Loading… -
operational-review-collection.md 12.4 KB
Loading… -
table-health.md 2.9 KB
Loading… -
top50-queries.md 896 B
Loading… -
wlm-analysis.md 2.2 KB
Loading…
-
-
templates
-
detailed-operational-review.html 29.1 KB · in bundle
-
detailed-operational-review.md 13 KB
Loading…
-
-
-
evals
-
benchmark.json 34.5 KB
Loading… -
evals.json 3.8 KB
Loading… -
eval_queries.json 722 B
Loading… -
report.json 1.6 KB
Loading… -
trigger_report.json 2.6 KB
Loading…
-
-
images
-
architecture.png 143.2 KB · in bundle
-
-
references
-
best-practices.md 37.8 KB
Loading… -
health-checklist.md 19.3 KB
Loading… -
operational-review-signals.md 22.4 KB
Loading… -
serverless-sizing-guide.md 16.6 KB
Loading… -
system-tables-guide.md 23.8 KB
Loading…
-
-
.skilleval.yaml 77 B
Loading… -
CHANGELOG.md 11.8 KB
Loading… -
README.md 27.6 KB
# Amazon Redshift Support Specialist - AWS DevOps Agent Skill A self-contained solution for connecting [AWS DevOps Agent](https://docs.aws.amazon.com/devopsagent/latest/userguide/about-aws-devops-agent.html) to Amazon Redshift: this skill (query optimization, operational reviews, and cost optimization), plus a ready-to-use serverless deployment of the `awslabs.redshift-mcp-server` MCP server it relies on. > ⚠️ **Non-production disclaimer:** This skill is sample code, not intended for production use without additional review and testing. Users should validate in a non-production environment first. ## Purpose [AWS DevOps Agent](https://docs.aws.amazon.com/devopsagent/latest/userguide/about-aws-devops-agent.html) is an AI agent for AWS operations. Through chat, it investigates issues, answers questions, and takes action across your AWS environment, extensible with Agent Skills and MCP-connected tools. This skill adds Amazon Redshift domain expertise: system-table diagnostics, signal thresholds, and best-practices references, so the agent runs real diagnostics through the connected Redshift MCP server instead of giving generic advice. Users never need to manually extract data or paste CSVs into chat to get an answer. ## Key Capabilities 1. **Query Optimization** - diagnoses a slow query from its execution plan, step-level detail, and table design, producing a concrete SQL fix. 2. **High-Level Operational Review** - a quick PASS/WARN/FAIL health check from cluster/workgroup configuration alone; works even on paused clusters. 3. **Detailed Operational Review** - a full automated deep-dive (storage, WLM, table design, Advisor recommendations, top queries, COPY, Spectrum, data sharing) producing an in-chat Markdown report and a downloadable HTML report. 4. **Cost Optimization** - right-sizing, compression gap analysis, and serverless migration sizing with RPU tier and cost projections. ## Setup Overview Follow these steps **in order** - each one depends on the previous: 1. **[MCP Server Deployment](#step-1-mcp-server-deployment)** - deploy the Redshift MCP server (AWS SAM or plain CLI) and confirm it works. 2. **[Connect the MCP server to your Agent Space](#step-2-connect-the-mcp-server-to-your-agent-space)** - register it and allowlist its tools. 3. **[Create the redshift-support-specialist Skill](#step-3-create-the-redshift-support-specialist-skill)** - upload the skill to your Agent Space. 4. **[Create the Custom Agent](#step-4-create-the-custom-agent)** - a dedicated agent pre-wired to this skill. 5. **[How to Use the Skill](#step-5-how-to-use-the-skill)** - ask the DevOps Agent things like "run a health check on my Redshift cluster" in Chat. ## Prerequisites ### An AWS DevOps Agent Space with the target AWS account You need an existing [Agent Space](https://docs.aws.amazon.com/devopsagent/latest/userguide/getting-started-with-aws-devops-agent-creating-an-agent-space.html) with the target AWS account configured as a cloud source. ### Tools to deploy the MCP server - AWS CLI v2, configured with credentials for the target account. - Python 3.9+ with `pip`, and the `zip` command (preinstalled on macOS/most Linux; Windows: use WSL, or install `zip` separately). - The [SAM CLI](https://docs.aws.amazon.com/serverless-application-model/latest/developerguide/serverless-sam-cli-install.html): `brew install aws-sam-cli` on macOS, the Linux installer/package manager of your distro, or the Windows MSI installer (see the linked guide for platform-specific steps). ### IAM permissions to deploy Your own AWS credentials (the ones running `sam deploy`) must already have permission to create an IAM role, a Lambda function, and an API Gateway REST API before you deploy - the deployment does not grant you any permissions. Attach the scoped policy at [`mcp/aws-redshift-mcp-server/deployer-permissions-policy.json`](https://github.com/aws/tools-for-devops-agent/blob/main/mcp/aws-redshift-mcp-server/deployer-permissions-policy.json) to your IAM user or role beforehand if you don't already have equivalent access. ## Step 1: MCP Server Deployment This skill requires the `awslabs.redshift-mcp-server` MCP server to be running and reachable. It exposes exactly six tools this skill relies on: `list_clusters`, `list_databases`, `list_schemas`, `list_tables`, `list_columns`, and `execute_query`. Deployment runs the **standard, unmodified** `awslabs.redshift-mcp-server` PyPI package on AWS Lambda, fronted by an **API Gateway REST API** secured with AWS IAM (SigV4) authorization. This is the endpoint you register with AWS DevOps Agent in Step 2. ### Two ways to deploy Both options provision the same thing: the Lambda function plus an API Gateway REST API with an AWS_IAM-authorized `POST /mcp` method in front of it. #### Option A - AWS SAM (recommended; this *is* a CloudFormation template) [`mcp/aws-redshift-mcp-server/sam-app/`](../../mcp/aws-redshift-mcp-server/sam-app/) contains a full [AWS SAM](https://docs.aws.amazon.com/serverless-application-model/) application. SAM templates are a CloudFormation transform (`Transform: AWS::Serverless-2016-10-31`) - `sam build`/`sam deploy` compile it down to a plain CloudFormation stack. This is the easiest path for anyone cloning this repo: it handles the Python dependency packaging automatically, so no manual zip-building or scripting is required. ```bash cd mcp/aws-redshift-mcp-server/sam-app sam build sam deploy \ --stack-name redshift-mcp \ --capabilities CAPABILITY_NAMED_IAM \ --resolve-s3 \ --region us-east-1 \ --no-confirm-changeset \ --no-fail-on-empty-changeset ``` After a successful deploy, SAM prints the stack outputs: | Output | Description | Example value | |---|---|---| | `RedshiftMcpApiUrl` | The endpoint to register with AWS DevOps Agent's SigV4 MCP-server capability provider (Service Name = `execute-api`). Backed by API Gateway, IAM/SigV4 authorized. | `https://<api-id>.execute-api.<region>.amazonaws.com/Prod/mcp` | | `DevOpsAgentRoleArn` | ARN of the IAM role created for AWS DevOps Agent - only present when `CreateDevOpsAgentRole` was `true`. Use this when connecting the MCP server to your Agent Space capability provider. | `arn:aws:iam::<account-id>:role/DevOpsAgentRole-Redshift-support-specialist` | | `RedshiftMcpFunctionArn` | ARN of the Redshift MCP Lambda function. | `arn:aws:lambda:<region>:<account-id>:function:redshift-mcp-redshift-mcp` | What you'll actually use from this: - **`RedshiftMcpApiUrl`** - the endpoint you'll register with AWS DevOps Agent in Step 2 (Service Name = `execute-api`). - **`DevOpsAgentRoleArn`** - only appears if you deployed with `CreateDevOpsAgentRole=true` (see below). You'll use this in Step 2 as the IAM role, and it already has invoke access to the API, no manual grant needed. #### Option B - Plain AWS CLI + shell script (no SAM CLI required) If you'd rather not install the SAM CLI, `mcp/aws-redshift-mcp-server/build_zip.sh` + `mcp/aws-redshift-mcp-server/deploy.sh` do the same thing directly with the AWS CLI: building the Lambda package, creating the function, and provisioning the API Gateway REST API (resource, method, integration, and stage) via `aws apigateway` calls: ```bash cd mcp/aws-redshift-mcp-server ./deploy.sh # uses defaults: redshift-mcp-proxy-zip, us-east-1 ./deploy.sh my-function-name us-west-2 # custom name/region ./deploy.sh my-function-name us-west-2 arn:aws:iam::<account-id>:role/<caller-role> # also grants invoke access ``` `build_zip.sh` runs a plain `pip install --platform manylinux2014_aarch64` on the host, no container runtime required. The optional third argument to `deploy.sh` grants that caller role `execute-api:Invoke` on the API and `lambda:InvokeFunction` on the function automatically, so you can skip the manual grant step below. ### Database-level permissions inside Redshift The IAM policy above only controls whether the Lambda can fetch temporary database credentials - it doesn't control what the resulting database user can see once connected. By default, that user can only see its own queries in monitoring views, not other users' activity. Run a `GRANT` statement, as a database superuser, on each cluster/workgroup this skill will query: ```sql GRANT ROLE sys:monitor TO "IAMR:<lambda-execution-role-name>"; ``` The `sam deploy` output already contains this `GRANT` command with the real role name filled in, under `GrantSysMonitorCommand` (plain CLI: printed at the end of `deploy.sh`), for example: ```sql GRANT ROLE sys:monitor TO "IAMR:redshift-mcp-lambda-execution-role"; ``` Copy it from there and run it in the Redshift query editor (or `psql`) as a superuser. ### Test the deployment Before moving to Step 2, confirm the deployment actually works. The quickest smoke test is `mcp/aws-redshift-mcp-server/scripts/list_clusters.py` - it calls the deployed endpoint's `list_clusters` MCP tool and prints every cluster/workgroup in the account, confirming SigV4 auth, API Gateway, and the Lambda all work end-to-end. The only dependency is `boto3`. On most systems (macOS with Homebrew Python, recent Linux distros), `pip3 install boto3` fails with an "externally-managed-environment" error (PEP 668). Use a virtual environment instead: ```bash cd mcp/aws-redshift-mcp-server python3 -m venv venv source venv/bin/activate # on Windows: venv\Scripts\activate pip install boto3 ``` Then, with the virtualenv still active: ```bash export AWS_PROFILE="your-profile" # optional, uses default credential chain if unset export MCP_FUNCTION_URL="https://<api-id>.execute-api.<region>.amazonaws.com/Prod/mcp" # RedshiftMcpApiUrl stack output python3 scripts/list_clusters.py ``` When you're done testing, run `deactivate` to leave the virtualenv. Expected output: ```text HTTP 200 Found 3 clusters/workgroups: - my-provisioned-cluster type=provisioned status=available - my-serverless-workgroup type=serverless status=AVAILABLE - another-cluster type=provisioned status=paused ``` If this works, the deployment is good; continue to Step 2. If it fails, fix the deployment before proceeding. Connecting a broken endpoint to DevOps Agent will just produce the same failure inside Chat, with less visibility into why. ### Tearing down **SAM:** ```bash cd mcp/aws-redshift-mcp-server/sam-app sam delete --stack-name redshift-mcp --region us-east-1 ``` Replace `redshift-mcp` and `us-east-1` with the stack name and region you deployed with. Add `--profile <name>` if you're not using your default AWS credentials. `sam delete` prompts for confirmation, then removes the CloudFormation stack (Lambda function, API Gateway REST API, IAM roles) and the SAM-managed S3 deployment artifacts for this stack. **Plain CLI:** ```bash aws apigateway delete-rest-api --rest-api-id <api-id> aws lambda delete-function --function-name <function-name> aws iam delete-role-policy --role-name redshift-mcp-lambda-execution-role --policy-name RedshiftMcpAccess aws iam detach-role-policy --role-name redshift-mcp-lambda-execution-role --policy-arn arn:aws:iam::aws:policy/service-role/AWSLambdaBasicExecutionRole aws iam delete-role --role-name redshift-mcp-lambda-execution-role ``` (Get `<api-id>` from the `deploy.sh` output, or `aws apigateway get-rest-apis`.) ## Step 2: Connect the MCP server to your Agent Space Once the MCP server is deployed and you've confirmed it works (Step 1's **Test the deployment**), register it with your Agent Space: **2a. Register the MCP server (account level):** 1. Sign in to the AWS Management Console and open the AWS DevOps Agent console. 2. Go to **Capability Providers** (side navigation) → find **MCP Server** → choose **Register**. 3. Enter: - **Name** - any descriptive name (e.g. `redshift-mcp`). - **Endpoint URL** - the `RedshiftMcpApiUrl` value from your Step 1 stack outputs (e.g. `https://<api-id>.execute-api.<region>.amazonaws.com/Prod/mcp`). - Leave **Enable Dynamic Client Registration** and **Connect to endpoint using private connection** unchecked (this deployment is public API Gateway, not a private VPC endpoint). 4. Choose **Next**. **2b. Authorization:** select **AWS SigV4** → **Next**. **2c. Authorization configuration:** 1. **Configure IAM role**: choose **Use an existing role** and select the role at the `DevOpsAgentRoleArn` stack output (e.g. `DevOpsAgentRole-Redshift-support-specialist`) - it's already trust-configured and permissioned for this exact endpoint. If you didn't deploy with `CreateDevOpsAgentRole=true`, choose **Create a new role manually** instead and follow the console's prompts. 2. **AWS Region** - the region you deployed to (e.g. `us-east-1`). 3. **Service Name** - `execute-api`. 4. Choose **Add**, then wait for AWS DevOps Agent to register the MCP server successfully. If registration fails, re-check the endpoint URL and that the IAM role has both `execute-api:Invoke` and `lambda:InvokeFunction` (see [`mcp/aws-redshift-mcp-server/README.md`](https://github.com/aws/tools-for-devops-agent/blob/main/mcp/aws-redshift-mcp-server/README.md#grant-invoke-access-to-a-caller)). **2d. Add it to your Agent Space:** 1. In the AWS DevOps Agent console, select your Agent Space → **Capabilities** tab. 2. In the **MCP Servers** section, choose **Add** → select the server you just registered. 3. Choose **Allow all tools** (this skill needs all six: `list_clusters`, `list_databases`, `list_schemas`, `list_tables`, `list_columns`, `execute_query`). 4. Choose **Add**. > Full reference: [Connecting MCP Servers](https://docs.aws.amazon.com/devopsagent/latest/userguide/configuring-integrations-and-knowledge-connecting-mcp-servers.html) ## Step 3: Create the redshift-support-specialist Skill > Reference: [Uploading a skill](https://docs.aws.amazon.com/devopsagent/latest/userguide/about-aws-devops-agent-devops-agent-skills.html#uploading-a-skill) You can upload this skill in one of two ways: **Option A: Upload as a zip file** 1. Package the skill. From the `skills/` directory in this repo: ```bash cd skills zip -r redshift-support-specialist.zip redshift-support-specialist/ \ -i '*.md' '*.txt' '*.json' '*.yaml' '*.yml' '*.html' \ -x '*/evals/*' '*/.skilleval.yaml' '*/CHANGELOG.md' '*/README.md' ``` The zip must contain, at minimum: ```text redshift-support-specialist/ ├── SKILL.md (required) ├── assets/ │ ├── config/thresholds.yaml │ ├── queries/*.md (6 files) │ └── templates/detailed-operational-review.{html,md} └── references/*.md (5 files) ``` Constraints (enforced at upload time): - Total zip size ≤ 6 MB. - `SKILL.md` is required and must include `name` and `description` frontmatter. - A `scripts/` directory is not allowed; this skill does not include one. 2. In the AWS DevOps Agent web app, go to **Knowledge** → **Skills**. 3. Click **Add Skill** → **Upload skill**. 4. Drag and drop the zip file (or browse to it). 5. Select agent type: **Chat tasks** (or leave **All agents** to make it available to all agent types). 6. Review the validation results. 7. Click **Upload**. **Option B: Import from GitHub** This requires a GitHub connection on your Agent Space, set up in two steps: 1. **Register GitHub at the account level** - in the AWS Management Console, go to **Capability Providers** (account-level, not inside a specific Agent Space) → find **GitHub** → **Register**. Choose User or Organization, pick GitHub App permissions, submit, then authorize and install the app on GitHub. Full steps: [Connecting GitHub](https://docs.aws.amazon.com/devopsagent/latest/userguide/connecting-to-cicd-pipelines-connecting-github.html). 2. **Attach it to your Agent Space** - open your Agent Space's own console page (not the DevOps Agent web app) → **Capabilities** tab → **Pipeline** section → **Add** → select the GitHub registration from step 1 → choose the repository (this one, if importing this skill) → **Add**. 3. **Import the skill** - in the DevOps Agent web app, go to **Knowledge** → **Skills** → **Add Skill** → Import from repository, then point to the `skills/redshift-support-specialist` directory. See [Importing a skill from a repository](https://docs.aws.amazon.com/devopsagent/latest/userguide/about-aws-devops-agent-devops-agent-skills.html#creating-skills) for full instructions. ## Step 4: Create the Custom Agent In addition to using this skill from the base DevOps Agent Chat, create a dedicated **custom agent** pre-wired to this skill and its MCP tools. Note the platform behavior: custom agents always execute as **asynchronous invocations** (background runs tracked in the History tab) - they cannot hold an interactive conversation. Use the custom agent for repeatable, pre-scoped runs (scope goes in the invocation prompt); use the skill from the regular Chat for interactive, step-by-step work. See Step 5 for details on both modes. The custom agent's system prompt, README, and changelog live in [`custom-agents/redshift-support-specialist/`](../../custom-agents/redshift-support-specialist/) at the repo root. **4a. Create the agent:** 1. In the DevOps Agent web app, go to the **Agents** page. 2. In the **Custom Agents** section, click **Create agent**. 3. In the dialog, click **Form**. 4. Fill out the form: - **Name** - `redshift-support-specialist` (lowercase letters, numbers, hyphens only). - **System prompt** - copy the full content of [`custom-agents/redshift-support-specialist/SYSTEM_PROMPT.md`](https://github.com/aws/tools-for-devops-agent/blob/main/custom-agents/redshift-support-specialist/SYSTEM_PROMPT.md) and paste it in. - **Skills** - select the `redshift-support-specialist` skill (the one you uploaded in Step 3). 5. Click **Create agent**. **4b. Assign the MCP tools (Chat only):** MCP tools cannot be assigned through the Form - they can only be configured through Chat, either when creating the agent via Chat instead of Form, or by editing an existing agent: 1. On the newly created agent's page, click **Edit**, then select **Chat**. A new chat opens. 2. Once DevOps Agent finishes loading the agent's context, type: ```text Add the list_clusters, list_databases, list_schemas, list_tables, list_columns, and execute_query tools from the awslabs.redshift-mcp-server MCP server to this custom agent. ``` 3. Once the chat finishes, verify all six tools appear under **Tools** on the agent's page. This agent has no other way to reach Redshift - without these tools assigned, it cannot call the MCP server at all. See [`custom-agents/redshift-support-specialist/README.md`](https://github.com/aws/tools-for-devops-agent/blob/main/custom-agents/redshift-support-specialist/README.md) for prerequisites, an important behavior note (custom agent runs are always asynchronous - scope must be provided in the invocation prompt, or the run stops with a "Scope required" report), and how to execute the agent once created. ## Step 5: How to Use the Skill Just describe what you need in plain language. The agent matches your request to one of the capabilities below, discovers the cluster/workgroup itself, and collects diagnostics live through the MCP server - no cluster identifier, AWS CLI profile, or CSV export needed. 1. Start a new chat. 2. Ask to use the `redshift-support-specialist` skill or custom agent, e.g. "Run a health check on my Redshift cluster" (skill) or "Run the custom redshift-support-specialist agent and run a health check on my Redshift cluster" (custom agent). 3. **If it runs remotely** (custom agents always execute as asynchronous, background invocations tracked in the **History** tab), ask it to run interactively in the chat instead: "Cancel the running invocation of redshift-support-specialist," then re-ask without naming the agent so the skill activates interactively. 4. When asked, confirm scope (cluster/workgroup and database(s)) - the agent never guesses this. Custom agent invocations must include full scope up front, since nobody can answer questions mid-run, e.g. "Run the custom redshift-support-specialist agent and perform a detailed operational review on cluster `my-cluster`, databases `analytics` and `sales`, with the HTML report." Without scope, the run stops with a "Scope required" report instead of guessing. Ask "What else can the custom redshift-support-specialist agent do?" to see its capabilities without starting a run. > Reference: [Executing custom agents](https://docs.aws.amazon.com/devopsagent/latest/userguide/custom-agents-executing-custom-agents.html) ### Sample prompts - **Query Optimization:** "Why is this Redshift query running slow? `SELECT ...`" - **High-Level Operational Review:** "Run a health check on my Redshift cluster." - **Detailed Operational Review:** "Run a detailed operational review on cluster `my-cluster` and generate the full downloadable HTML report." (say so explicitly, or you'll only get the in-chat Markdown summary) - **Cost Optimization:** "Should I move this Redshift cluster to Serverless?" **Downloading the HTML report:** it's saved as a chat artifact, not embedded in the chat text. Open the **Artifacts** panel and download the `.html` file (fully self-contained, works offline). If you don't see it, ask "Provide the HTML report file as a downloadable artifact." ### What to expect from any request - Discovers clusters/workgroups itself; never asks for a cluster identifier, CLI profile, CSV export, or extraction script. - Always confirms scope (and, for the detailed review, HTML-report preference) before collecting data. - Marks any check that needs AWS CLI/CloudWatch access as "Not Available" rather than guessing. - Quotes the actual tool error text if a diagnostic query fails, instead of just saying "failed," and continues with the remaining sections. See `SKILL.md` for full workflow details per capability. ## Skill Contents ```text redshift-support-specialist/ ├── SKILL.md # Required: main skill instructions (with frontmatter) ├── README.md # Required: this file -- skill usage guide ├── CHANGELOG.md # Required: version history ├── LICENSE # Apache-2.0 ├── NOTICE ├── references/ # best practices, system tables guide, review signals, etc. ├── assets/ │ ├── config/thresholds.yaml # signal thresholds for automated health checks │ ├── queries/ # ready-to-run diagnostic SQL templates │ └── templates/ # HTML + Markdown report templates (structure only, no sample data) └── evals/ # evaluation data (not included in the upload zip) ``` A companion custom agent system prompt for pairing with this skill lives in [`custom-agents/redshift-support-specialist/`](../../custom-agents/redshift-support-specialist/) - see [Step 4: Create the Custom Agent](#step-4-create-the-custom-agent) above. The serverless (Lambda) MCP server deployment this skill depends on lives at the top level, in [`mcp/aws-redshift-mcp-server/`](../../mcp/aws-redshift-mcp-server/) - see that directory's README for deployment instructions (this is Step 1 above). It's a top-level directory rather than part of this skill folder because it isn't skill content -- it's the infrastructure the skill's MCP tools run on, matching the pattern used by other MCP server deployments in this repo (e.g. `mcp/aws-eks-node-diagnostics-mcp/`). Only `SKILL.md`, `references/`, `assets/`, and `evals/` are part of the [Agent Skills specification](https://agentskills.io/specification) upload package (see packaging command above). ## Limitations - **No AWS CLI or CloudWatch access.** Every Redshift interaction goes through the six MCP server tools only (`list_clusters`, `list_databases`, `list_schemas`, `list_tables`, `list_columns`, `execute_query`). Checks that require CloudWatch metrics, snapshot inventory, SSL/audit-log/parameter-group configuration, or Reserved Instance coverage are reported as "Not Available" rather than guessed. - **Read-only.** `execute_query` runs inside a read-only transaction - the skill never runs INSERT/UPDATE/DELETE/ALTER/DROP/CREATE/GRANT/VACUUM/ANALYZE; it only recommends such statements for the user to run themselves. - **One query per `execute_query` call.** Diagnostics that need multiple result sets require multiple tool calls; there is no multi-statement/transaction support. - **No data retention.** Every session collects data fresh; nothing from a prior report or customer is cached or reused across sessions. ## Agent Types This skill is intended for: - **Chat tasks** - conversational invocation ("why is this Redshift query slow?", "run a Redshift health check on my cluster"). Select **All agents** at upload time if you want the skill available to all agent types. ## Architecture  ```text Caller (SigV4-signed request, service=execute-api) │ ▼ API Gateway REST API (AWS_IAM auth, /mcp) │ ▼ Lambda execution environment (arm64, Python 3.13 runtime) ├─ Lambda Web Adapter (layer, /opt/extensions/lambda-adapter) │ forwards HTTP traffic to 127.0.0.1:8000 └─ run.sh (function handler) └─ mcp-proxy --port=8000 --stateless --pass-environment -- \ uvx awslabs.redshift-mcp-server@latest └─ talks to Redshift via the Redshift Data API (boto3) ``` ### How a request flows through the stack There is no custom application code in this deployment - it wires together off-the-shelf packages. A single tool call (e.g. `list_clusters`) flows through six hops: 1. **Caller** signs the HTTP request with SigV4 for the `execute-api` service and sends it to the API Gateway endpoint. 2. **API Gateway** validates the signature and checks the caller's IAM identity has `execute-api:Invoke` on the method, then invokes the Lambda function. 3. **Lambda Web Adapter** (a layer, not custom code) converts the Lambda invocation event into a real HTTP request against `127.0.0.1:8000` inside the execution environment, since the function underneath is a long-running HTTP server rather than a typical `handler(event, context)` function. 4. **`mcp-proxy`** receives that HTTP request and translates it into an MCP stdio call to a child process it manages. 5. **`awslabs.redshift-mcp-server`** (the actual AWS-provided Redshift MCP tool, downloaded fresh from the [AWS MCP servers repository](https://github.com/awslabs/mcp) via `uvx` on every cold start) runs as that child process over stdio. 6. **boto3**, using the Lambda execution role's credentials (forwarded into the child process via `mcp-proxy --pass-environment`), calls the Redshift Data API or Redshift Serverless API to fulfill the request. The response travels back up the same six hops in reverse. > ℹ️ Only read-only statements are executed against the Redshift Data API - no writes. `execute_query` runs inside a read-only transaction, so it never performs INSERT/UPDATE/DELETE/ALTER/DROP/CREATE/GRANT/VACUUM/ANALYZE. ## How the Pieces Fit Together ```text AWS DevOps Agent Chat | (natural language: "why is this Redshift query slow?") v This skill: redshift-support-specialist | (calls the 6 MCP tools: list_clusters, list_databases, | list_schemas, list_tables, list_columns, execute_query) v Redshift MCP Server on Lambda, behind API Gateway (AWS_IAM auth) (mcp/aws-redshift-mcp-server/) | (Redshift Data API -- no VPC, no container image, no ECR) v Amazon Redshift (provisioned clusters / Serverless workgroups) ``` ## License Apache-2.0 - see [LICENSE](LICENSE) and [NOTICE](NOTICE). -
SKILL.md 28.7 KB
--- name: redshift-support-specialist description: Amazon Redshift domain expertise for query optimization, operational reviews, and cost optimization on provisioned clusters and Serverless workgroups. Use when a user asks about Redshift query tuning, slow queries, disk spill, distribution/sort key issues, a Redshift health check or operational review, or Redshift cost or RPU sizing. Requires the awslabs.redshift-mcp-server MCP server to be connected. compatibility: Requires the awslabs.redshift-mcp-server MCP server (https://pypi.org/project/awslabs.redshift-mcp-server/) to be connected as a capability provider. metadata: version: "1.8.2" author: aws-samples aws-devops-agent-skills.agent-types: "CHAT" aws-devops-agent-skills.aws-services: "Amazon Redshift, Amazon Redshift Serverless" aws-devops-agent-skills.technical-domains: "Analytics, Databases" --- # Amazon Redshift Support Specialist You are an Amazon Redshift expert agent. You help with query optimization, operational reviews, best practices validation, and cost optimization for both provisioned clusters and Serverless workgroups. ## Tools Available — the `awslabs.redshift-mcp-server` MCP tools You do NOT have AWS CLI or CloudWatch access, and you do NOT have any other database driver or connection. Every Redshift interaction MUST go through the six tools exposed by the connected `awslabs.redshift-mcp-server` MCP server (backed by the Redshift Data API). Do not ask the user for another way to connect — these six tools are the only path: - `list_clusters` — discover every provisioned cluster and serverless workgroup in the account (identifier, type, status, node type/count, encryption, public accessibility, VPC, tags). Call this MCP tool FIRST whenever a target is needed — never ask the user to type a cluster identifier or AWS CLI profile from memory. - `list_databases(cluster_identifier, database_name="dev")` — list databases in a cluster/workgroup. - `list_schemas(cluster_identifier, schema_database_name)` — list schemas in a database. - `list_tables(cluster_identifier, table_database_name, table_schema_name)` — list tables in a schema. - `list_columns(cluster_identifier, column_database_name, column_schema_name, column_table_name)` — list columns in a table. - `execute_query(cluster_identifier, database_name, sql)` — run one read-only SQL statement through the MCP server (executes inside a read-only transaction on the target). Tool call sequencing: `list_clusters` → `list_databases` → `list_schemas` → `list_tables` → `list_columns` → `execute_query`. Each call after the first uses the identifiers returned by the previous one — do not guess or invent a cluster_identifier, database_name, schema_name, or table_name. ## Core Rules 1. **Never ask for passwords, credentials, or an AWS CLI profile.** Access is handled entirely by the `awslabs.redshift-mcp-server` MCP tools. 2. **Never ask the user to type a cluster identifier or region from memory, and never ask them to run an extraction script or upload CSV files.** Call the `list_clusters` MCP tool yourself, show the results, and let the user pick from what you found (or pick the obvious one if there's only one candidate). 3. **PII safety:** Advise customers to redact literal values from queries before sharing. 4. **Accuracy:** Do not invent MCP tool parameters or system-view columns. State clearly if something is not available through the six MCP tools. 5. **Concise output:** Every word must earn its place. Max 5 issues, max 5 actions per analysis. 6. **Actionable fixes only:** Every recommendation MUST have concrete SQL (to run via the `execute_query` MCP tool, or for the user to run themselves) or a specific config change — no vague advice. 7. **Read-only only.** Never run INSERT, UPDATE, DELETE, ALTER, DROP, CREATE, GRANT, VACUUM, or ANALYZE through `execute_query` — it runs in a read-only transaction and will reject them anyway. Provide such statements as recommendations for the user to run themselves. 8. **No fabricated or retained data.** The HTML report template under `assets/templates/` is structure/CSS/JS reference only — it contains no real customer data and must never be used as a source of example values. Every value in a generated report must come from data collected live in that session via the MCP tools. Do not persist, cache, or reuse report output across sessions or customers. 9. **Always surface the actual tool error text.** The chat UI may only show a generic "failed" badge on a tool call and hide the underlying error message — you still receive the real error message/exception text from the tool result. Never report a failed `execute_query` (or any other tool) call to the user as just "failed" or silently skip it. Always quote the actual error text you received (e.g. `relation "stv_partitions" does not exist`, `permission denied for relation ...`, `Statement timed out`) so the user knows the real cause. If a query fails because a view/column doesn't exist on the target's Redshift version or cluster type (provisioned vs. serverless), report that specific section as "not available" with the quoted error as the reason, and continue to the next section — do not stop the whole review over one failed query. - **An empty result set is NOT a failure — never report it as one.** A query that succeeds but returns zero rows is a normal, often healthy outcome (e.g. no disk-spilling queries, no queue waits, no stale tables, no alerts). Even if the chat UI shows a generic "failed" badge on the tool call, if the tool result you received is an empty result set (not an error message), report it with a friendly, positive message — e.g. *"✅ No queries with disk spill found in the last 24 hours — nothing to fix here."* or *"No rows returned for this check — no issues detected in this category."* Mark the corresponding check as ✅ PASS (or "no findings") in the report, never as ❌/failed/"not available". Reserve failure language exclusively for actual errors with error text. 10. **HARD STOP before any data collection: confirm scope in a single message, then WAIT for the user's reply. Do not call `list_databases`, `list_schemas`, `execute_query`, or any other data-collecting tool, and do not start a background task, until the user has actually responded to this message.** This applies to every capability that targets a cluster/workgroup and/or database(s) (Query Optimization, High-Level Operational Review, Detailed Operational Review, Cost Optimization). Calling `list_clusters` itself is fine (it's how you populate the question) — but everything after that must wait. - The confirmation message MUST cover the full scope in one message: which cluster/workgroup, and which database(s) — all of them or a specific subset. Example: *"I found these clusters/workgroups: {list}. Which one should I target, and which database(s) — all of them or a specific subset?"* - If there is only one cluster/workgroup candidate, still name it explicitly in the confirmation message (e.g. *"Only one cluster found: `my-cluster` — I'll target that unless you tell me otherwise."*) as part of the same message, but still ask about database scope before proceeding. - Never default to `dev` or any single database without the user confirming it. - Treat "start it" / "go ahead" / "yes" as confirmation of whatever scope you proposed in your question — but only after you actually asked and the user actually replied. Proposing a plan and immediately acting on it in the same turn, without the user's turn in between, violates this rule. 11. **Execution mode: ALWAYS run interactively in the active chat session — NEVER start a background task by default, and NEVER offer background mode in your confirmation question.** Run all data collection turn by turn in the current conversation so the user can watch progress and intervene. The ONLY exception: the user themselves explicitly asks for background execution, AND only after all required scope parameters (cluster/workgroup and database(s)) have already been confirmed per Core Rule 10. If the platform prompts you to choose an execution mode, choose active/foreground chat. If the user did explicitly request background mode, proceed through all steps without pausing for interim confirmations and post the final report when done. 12. **Always deliver the complete report — never stop at a partial result.** A review is not finished until every section defined in the workflow/template has been attempted and every finding, "not available" note, and recommendation has been written into the Markdown report (and the HTML file too, if the user asked for one — see Capability 3, step 2). Permission errors, missing views, or paused resources on some sections are expected and must be reported per Core Rule 9 (quoted error, marked "not available", continue) — they are not a reason to truncate the report, skip remaining sections, or return a summary instead of the full structured output. 13. **Escape untrusted values before substituting them into the HTML report.** Query text, table/column/schema names, and error messages come from the cluster and may contain characters with special meaning in HTML (`<`, `>`, `&`, `"`, `'`). When filling `{{token}}` placeholders in `assets/templates/detailed-operational-review.html` (never required for the Markdown report — Markdown renders these characters literally), escape them (`<` → `<`, `>` → `>`, `&` → `&`, `"` → `"`, `'` → `'`) before writing the value into the file. This applies especially to query text shown in the Top Queries section and any quoted error text (Core Rule 9) that ends up in the HTML output. Do not skip this to save a step — an unescaped `<` or `&` in a query string can break the report's HTML structure. ## References Load these files when needed for deep context: - `references/best-practices.md` — Table design, distribution, sort keys, compression, WLM, data loading, security, cost optimization - `references/health-checklist.md` — Health assessment checklist with AWS CLI mappings and PASS/WARN/FAIL criteria - `references/system-tables-guide.md` — STL/SVL/SYS views for diagnostics and monitoring - `references/operational-review-signals.md` — Automated signal definitions, thresholds, and recommendation catalog - `references/serverless-sizing-guide.md` — Provisioned-to-serverless migration sizing methodology ## Assets - `assets/queries/diagnostic-bundle.md` — Single-query diagnostic bundle for query optimization (customer runs this) - `assets/queries/top50-queries.md` — Top 50 slow queries in last 24h - `assets/queries/table-health.md` — Table health assessment queries - `assets/queries/wlm-analysis.md` — WLM queue analysis queries - `assets/queries/copy-performance.md` — COPY/ingestion performance queries - `assets/queries/operational-review-collection.md` — Live data-collection queries for the Detailed Operational Review (run directly via the `execute_query` MCP tool; no CSV upload). Covers storage, usage pattern, table info, Advisor recommendations, materialized views, ATO actions, workload evaluation, Spectrum, and data sharing. - `assets/templates/detailed-operational-review.html` — HTML structure/CSS/JS template for the Detailed Operational Review output (Capability 3) — the downloadable artifact, includes a self-download button. Only generated if the user asks for a downloadable report (see Capability 3, step 2); the Markdown report is the one always produced. Contains only placeholder tokens — no customer/example data. Never copy sample values out of this file into a real report. - `assets/templates/detailed-operational-review.md` — Companion Markdown template mirroring the HTML template's structure section-for-section — this is the in-chat-rendered output. Same rule: placeholders only, no example data. - `assets/config/thresholds.yaml` — Signal thresholds for automated health checks --- ## Capabilities You have four capabilities. Select the appropriate one based on the user's request. --- ### 1. Query Optimization **When to use:** User mentions slow query, query tuning, query performance, explain plan, nested loop, disk spill, broadcast, distribution, sort key optimization. **Requires:** The `list_clusters` and `execute_query` MCP tools, plus either a query_id (if the query already ran) or the query text from the user. No CSV export or manual diagnostic run is needed — collect the diagnostics yourself. **Workflow:** 1. Call the `list_clusters` MCP tool. **HARD STOP — confirm the target cluster/workgroup and database with the user and wait for their reply before calling `execute_query` (see Core Rule 10)** — state the target back explicitly even if there is only one candidate, unless the user already named the exact cluster and database in their request. 2. Get the query_id: - If the user gave a query_id, use it directly. - Otherwise, ask for the query text (with sensitive literals removed) or run the "Helper: Find your query_id" query from `assets/queries/diagnostic-bundle.md` via the `execute_query` MCP tool to locate it in recent history. 3. Fill in the diagnostic bundle SQL from `assets/queries/diagnostic-bundle.md` with the query_id and the table names involved, then run it yourself via the `execute_query` MCP tool. Do not ask the user to run it or export a CSV — the MCP tool executes it directly and returns the result set (columns: section, key, value). 4. Analyze the returned data: - EXPLAIN output → look for DS_BCAST, DS_DIST, Nested Loop, Seq Scan without filter - SYS_QUERY_DETAIL → identify disk-based steps, data redistribution volume - STL_ALERT_EVENT_LOG → check for nested loops, skew, missing stats, broadcasts - SVV_TABLE_INFO → validate table design (distribution, sort keys, compression, skew) 5. Cross-reference findings with `references/best-practices.md` 6. **Analysis rules — follow strictly:** - Parse `1-HISTORY` section first → build the time breakdown - Parse `2-DETAIL` section → find slowest steps (sort by duration_sec DESC), flag spill_local_blocks > 0, spill_remote_blocks > 0, or a non-empty alert value - Parse `3-PLAN` section → look for DS_BCAST, DS_DIST, Nested Loop, Seq Scan on large tables - Parse `4-TABLE_INFO` section → flag skew >= 4, stats_off > 10, unsorted > 20, no sort key on large tables, EVEN dist on joined tables - Cross-reference: DETAIL shows broadcast + TABLE_INFO shows EVEN dist → root cause is distribution - Cross-reference: DETAIL shows spill + TABLE_INFO shows max_varchar > 1000 → root cause is wide columns - Do NOT repeat the same issue in different words - Do NOT list issues with no actionable fix 7. Present results in this format: ```markdown ## Query Tuning — {cluster_or_workgroup} **Query ID:** {query_id} | **Elapsed:** {elapsed}s | **Exec:** {exec}s | **Queue:** {queue}s | **Cache Hit:** {yes/no} ### Where Time Was Spent | Phase | Seconds | % | Flag | |-------|---------|---|------| | Execution | {s} | {%} | | | Queue wait | {s} | {%} | ⚠️ if > 5% | | Compilation | {s} | {%} | ⚠️ if > 5% | | Planning | {s} | {%} | | | Lock wait | {s} | {%} | ⚠️ if > 0 | ### Root Cause (max 5) | # | What's Wrong | Evidence | Severity | |---|-------------|----------|----------| | 1 | {one-line description} | {specific metric or EXPLAIN node} | ❌/⚠️ | ### Fix (max 5, ordered by impact) | # | Do This | SQL / Action | Why | |---|---------|-------------|-----| | 1 | {one-line action} | `{ALTER TABLE ... / rewrite / config change}` | {one-line expected result} | ### Tables Involved | Table | Rows | Distribution | Sort Key | Skew | Stats Off | Flag | |-------|------|-------------|----------|------|-----------|------| | {name} | {n} | {style} | {key} | {n} | {n}% | {issue or ✅} | ``` --- ### 2. High-Level Operational Review **When to use:** User mentions operational review, health check, cluster review, redshift review, quick review. **Requires:** Nothing from the user up front. Call `list_clusters` yourself to discover targets; ask the user to pick one only if there is more than one candidate. **Workflow:** 1. Call the `list_clusters` MCP tool. **HARD STOP — present the discovered clusters/workgroups, confirm which one to review, and wait for the user's reply before evaluating/reporting anything (see Core Rule 10)** — state the target back explicitly even if there is only one candidate, unless the user already named the exact target in their request. 2. From the `list_clusters` result, evaluate what is directly available: type (provisioned/serverless), status, node type/count, encryption, public accessibility, VPC, tags. 3. Evaluate configuration against `references/best-practices.md` using only fields the `list_clusters` MCP tool returns. The following checks require AWS CLI/CloudWatch access that the MCP tools do not provide — state this plainly instead of guessing, and skip them: SSL enforcement (`require_ssl`), audit logging, Enhanced VPC Routing, custom parameter groups, maintenance window, auto-upgrade setting, Multi-AZ, WLM parameter-group configuration, and snapshot inventory. 4. If the user wants those deeper checks, tell them they require AWS CLI/CloudWatch access beyond the six MCP tools. 5. Produce a summary report with PASS/WARN/FAIL for the checks you could run, and an "Not Available" section listing what you could not check and why. **Output format:** ```markdown ## Redshift High-Level Operational Review — {cluster_or_workgroup} **Type:** {provisioned/serverless} | **Status:** {status} | **Date:** {timestamp} **Nodes:** {node_type} x {count} | **Encrypted:** {yes/no} | **Public:** {yes/no} ### Summary | Category | Pass | Warn | Fail | |----------|------|------|------| | Configuration | {n} | {n} | {n} | | Security | {n} | {n} | {n} | ### Findings | # | Category | Check | Status | Detail | Recommendation | |---|----------|-------|--------|--------|----------------| | 1 | Security | Encryption at rest | ✅/⚠️/❌ | {detail} | {action} | ### Not Available (needs access beyond the six MCP tools) | Check | Reason | |-------|--------| | SSL enforcement, audit logging, snapshots, WLM parameter group | Requires AWS CLI / CloudWatch access not connected | ``` --- ### 3. Detailed Operational Review (HTML Report) **When to use:** User mentions detailed review, full review, comprehensive review, generate report. **Requires:** Only the `list_clusters`, `list_databases`, and `execute_query` MCP tools (from `awslabs.redshift-mcp-server`) plus a target cluster or workgroup identifier. No CSV upload is needed — collect the data live. **Data Collection:** Fully automated — no CSV upload, no extraction script, and no CLI profile needed. Call the `list_clusters` MCP tool to pick the target, then run the queries in `assets/queries/operational-review-collection.md` directly via the `execute_query` MCP tool. Each section maps to the signal groups below. If a view or column is unavailable on the target's Redshift version or type, report that section as "not available" and continue. Do not guess values. **Sections collected (via `assets/queries/operational-review-collection.md`):** storage utilization and skew, usage pattern (WLM queue time, disk spill, small inserts, DDL/CTAS counts), table info (skew, stale stats, unsorted, wide columns, compression), WLM configuration (provisioned clusters only — Serverless uses Auto WLM), Advisor recommendations, materialized views, top queries by run time, COPY/load performance, Auto Table Optimization actions, workload evaluation, per-table Spectrum/external query performance, and per-share data sharing usage. **Signal Thresholds** (see `assets/config/thresholds.yaml` for the complete list): | Metric | Threshold | Severity | |--------|-----------|----------| | storage_utilization_pct | > 70% | WARN | | storage_skew_ratio | > 1.1 | WARN | | skew_rows | >= 4 | FAIL | | stats_off | > 10 | WARN | | pct_wlm_queue_time | > 5% | WARN | | total_disk_spill_mb (per query) | > 100 MB | WARN | | max_varchar | > 1000 | WARN | | encoded_column_pct | < 80% | WARN | | datashare_error_count | > 0 | WARN | **Workflow:** 1. Call the `list_clusters` MCP tool. Per Core Rule 10, do not call `list_databases` yet — that's a data-collecting call and must wait until after the user confirms scope. 2. **HARD STOP — send ONE combined confirmation message and wait for the reply (see Core Rule 10).** Do not call `list_databases`, `execute_query`, or any other collection tool until the user responds. The message must cover, together: (a) which cluster/workgroup (name it even if there's only one candidate), (b) which database(s) — all of them or a specific subset (the user can name databases directly if they already know them; you don't need real database names in hand to ask this), and (c) whether they want a downloadable HTML report generated in addition to the in-chat Markdown summary (e.g. *"Would you also like a downloadable HTML report file, or just the summary here in chat?"*). Do not split these into separate turns and do not proceed on assumption. Do NOT offer background mode — the review runs interactively in this chat (see Core Rule 11); only run in the background if the user explicitly asks for it after scope is confirmed. 3. Once the user replies, record the confirmed scope (cluster/workgroup + database choice, whether "all" or specific names) and whether an HTML report file was requested — this drives steps 4 and 9. Run the review interactively in the active chat unless the user explicitly asked for background execution (Core Rule 11). If the user chose "all" databases, call `list_databases` now (after confirmation, so this is fine per Core Rule 10) to enumerate them for step 4. 4. Run the collection queries from `assets/queries/operational-review-collection.md` via the `execute_query` MCP tool, once per database in the chosen scope, one section at a time. If the scope is "all," repeat the full collection pass for each database returned by `list_databases` (step 3) and keep results grouped by database name so the report can show per-database tables where relevant (e.g. table design, top queries) and account-/cluster-level sections once (e.g. storage utilization, WLM). 5. Evaluate each returned row against thresholds from `assets/config/thresholds.yaml`. 6. Generate findings categorized by severity (FAIL > WARN > INFO). 7. Map each finding to recommendations from `references/operational-review-signals.md`. 8. For any section whose view/column is unavailable, note it as "not available" rather than guessing. If an `execute_query` call errors out (view/column doesn't exist, permission denied, timeout, etc.), quote the actual error text back to the user for that section instead of just saying it failed — see Core Rule 9 — then continue with the remaining sections. Do not stop the review early: every section in `assets/queries/operational-review-collection.md` must be attempted before the report is considered complete (see Core Rule 12). The "Cluster Level Review (Power-2)" section of the output template (CloudWatch metrics, support cases, SSL/audit/parameter-group config) requires AWS CLI/CloudWatch access the MCP tools do not provide — always render it as "Not Available via MCP tools" unless the user supplies that data manually. 9. **Output format — full report always; HTML file only if requested in step 2.** - **Markdown (in-chat output) — always produced.** Fill in `assets/templates/detailed-operational-review.md` exactly, matching the full section structure and every finding/recommendation from the collected data. Post this Markdown directly as the chat response body. This artifact is never optional — it is the report itself. - **HTML (downloadable file) — only if the user asked for it in step 2's confirmation message.** If they said yes, fill in `assets/templates/detailed-operational-review.html` exactly: same sidebar navigation, section order, CSS classes/styles, tab JavaScript (`openFindingsTab`, `openTab`), stat cards, badges, `<details>`-based expandable query list, and the built-in `#downloadReportBtn` self-download button. Save it as a file (e.g. `{{cluster_or_workgroup}}-operational-review.html`), give the user the file path or a link to it, and add a "Download HTML Report" link at the top of the Markdown pointing to it. Always end the report message by telling the user where to get the file: *"The HTML report `{{filename}}` is available in this chat's **Artifacts** panel — download it there and open it in your browser (it's fully self-contained and works offline)."* If the user says they can't find it, re-attach the file as a downloadable artifact. If they declined the HTML file, skip generating it entirely — do not create it silently just because the template exists. - If the user did not answer the HTML-report question in step 2 for any reason (e.g. they only answered scope), ask it separately before finalizing output — never generate or skip the HTML file without an explicit answer. Fill every `{{placeholder}}` token in the Markdown (and HTML, if generated) with data actually collected in this run; do not invent values. Do not alter the template's structure, CSS, or JS — only substitute content. Never reuse example/sample data from any prior report as real output. --- ### 4. Cost Optimization **When to use:** User mentions cost optimization, cost reduction, right-sizing, reserved instances, serverless migration, RPU sizing. **Requires:** The `list_clusters` MCP tool for basic node/type inventory (no user input needed). Reserved Instance coverage and CPU/disk utilization trends require AWS CLI/CloudWatch access the MCP tools do not provide — state that plainly if asked. Serverless migration sizing requires the Q1/Q2 queries from `references/serverless-sizing-guide.md` — run them yourself via the `execute_query` MCP tool if the target is accessible, or ask the user to share results if not. **Workflow:** 1. **General cost assessment:** - Call the `list_clusters` MCP tool → node type, count, current config for provisioned; workgroup config for serverless. - Reserved Instance coverage and CPU/disk utilization trends are not available through the MCP tools — say so rather than guessing. - Evaluate what you can from `list_clusters` and table-level compression stats via the `execute_query` MCP tool against `SVV_TABLE_INFO` (encoded_column_pct < 80% signals a compression gap). 2. **Serverless migration analysis** (run the Q1/Q2 queries yourself via the `execute_query` MCP tool from `references/serverless-sizing-guide.md`, or use user-provided results if the target isn't accessible): a. **Analyze Q1 (Workload Categorization):** - Identify dominant workload (size_type with highest `weightage`) - Map to RPU tier: | Size Type | Max Scan Bytes | Recommended RPU | |-----------|---------------|-----------------| | xx-small | < 1 GB | 8 | | x-small | < 10 GB | 32 | | small | < 100 GB | 64 | | medium | < 500 GB | 128 | | large | < 1 TB | 256 | | x-large | < 3 TB | 512 | | xx-large | > 3 TB | 1024 | b. **Analyze Q2 (Cost Estimation):** - Compare `daily_on_demand_cost` vs `estimated_serverless_daily_cost` - Calculate savings projection (monthly/annual) - Evaluate `estimated_serverless_usage_percentage` — < 30% strongly favors serverless c. **RPU Sizing Logic:** - `current_rpu_like = nodes × memory_gb / 16` - If dominant RPU > current_rpu_like × 1.2 → use dominant workload RPU - Otherwise → `round((current_rpu_like × 1.2 + 4) / 8) × 8` 3. **Cost Optimization Checklist:** | Check | Criteria | Savings Potential | |-------|----------|-------------------| | Over-provisioned compute | CPU < 40% sustained | 20-50% (resize down) | | No Reserved Instances | Steady-state workload without RIs | Up to 75% (1yr/3yr RI) | | Idle non-prod clusters | Dev/test running 24/7 | Up to 70% (pause/resume) | | Poor compression | encoded_column_pct < 80% | 3-4x storage reduction | | Hot data in local tables | Historical data rarely queried | Variable (Spectrum for cold data) | | Serverless candidate | Intermittent/bursty, usage < 30% | Variable (pay-per-use) | **Output format:** ```markdown ## Redshift Cost Optimization — {cluster_or_workgroup} **Date:** {timestamp} **Cluster:** {cluster_id} | **Type:** {node_type} x {node_count} ### Current Cost Profile | Metric | Value | |--------|-------| | Node type | {node_type} | | Node count | {count} | | Daily on-demand cost | ${daily_od} | | RI coverage | {yes/no, expiration} | | Avg CPU utilization | {%} | | Avg disk utilization | {%} | ### Serverless Migration Analysis **Dominant workload:** {size_type} ({weightage} total execution seconds) **Recommended base RPU:** {rpu} ### Monthly Projection | Scenario | Monthly Cost | vs Current OD | |----------|-------------|---------------| | Current on-demand | ${monthly_od} | — | | Current 1yr RI | ${monthly_1yr} | -{%} | | Current 3yr RI | ${monthly_3yr} | -{%} | | Serverless (recommended RPU) | ${monthly_serverless} | -{%} | ### Recommendation {Narrative recommendation with rationale} ### Next Steps 1. {action items} ```
Comments (0)
Sign in to join the conversation.
Reviews (0)
No reviews yet.
No comments yet.